Laser Cutter
Contents
Overview[edit]
Specifications[edit]
Laser Model: Rabbit Laser QX-80-1290 (80 Watt CO2)
Working area: 1200 x 900 mm (47.2 x 35.4 inches)
Laser Kerf Width: 0.254 mm (.01 inches)
Parts of the Laser[edit]
80 Watt laser tube - The laser tube lives at the back of the bed behind the white metal wall. This generates a beam of unfocused infrared radiation.
Mirrors - Three mirrors are located on the X/Y carriage of this laser. They reflect the beam from the tube to the focal assembly.
Focal assembly - This is the business end of the laser. This assembly contains the focusing lens, the auto-focus assembly, red-dot laser indicator, and plumbing for the "air-assist".
Auto-focus assembly - This laser is equipped with an auto-focusing attachment that allows it to touch off of a working surface and move itself into an optimal focal range.
X/Y carriage - Horizontal rails allow the focal assembly to move along the X and Y axes (left to right, and front to back).
Z-axis - Four ballscrews allow the bed of the laser to move vertically along the Z axis.
Honeycomb table - The table supports your material while also allowing exhaust to be pulled through the bed of the laser.
Chiller - An chiller constantly circulates cooled water through the outer layers of the laser tube to help prevent the tube from overheating and cracking.
Compressor / Air-assist - A small air compressor maintains constant airflow between the focusing lens and the cutting area. This helps extend the life of our optics and also produces cleaner cuts.
Safety[edit]
Machine Safety[edit]
- Only use materials on the approved list! If your material is not on the list you must get approved before attempting to cut or engrave it!
- Do not set the power setting above 85%. This extends the life of the laser tube considerably.
- Keep the area around the machine clean and free of unnecessary clutter, combustible materials, explosives, or volatile solvents such as acetone, alcohol, or gasoline.
The smoke generated from cutting materials deposit particles of residue on the lenses and mirrors of the laser. For the laser to work at its full potential proper maintenance is necessary. This is done by trained Tinkermill members so you don’t have to.
The machine is regularly checked and maintained but if you notice a loss in power or performance you can help by alerting a qualified TinkerMill member. If the laser does not seem to be cutting at its full potential please alert a member who has been trained in laser maintenance. If none are available please submit an email to info@tinkermill.com with a description of what you observed. Do not attempt to clean the optics or service the machine without training!
Keep all the lids closed while the machine is in use, including those on the sides of the machine.
Fire Safety[edit]
Laser cutting and engraving systems represent a significant fire hazard.
The materials on the approved list most likely to flare up are paper based products such as cardboard. The most common cause of flare-ups is cutting too slowly.
Keep a properly maintained and inspected fire extinguisher on hand.
The fire extinguisher adjacent to the laser cutter is of the CO2 variety and wont produce white particulates or mess up your project.
Material Selection[edit]
Our laser cutter is capable of cutting and engraving a wide range of materials. To help ensure that the laser stays in a working condition we ask that you only using materials on the approved material list. If you would like to use a material not found on the list (and it isn't on the do-not-cut list) please contact a shop captain and be prepared to provide a sample of your material.
You can help by testing your material according to the “IDENTIFICATION OF POLYMERS” booklet accompanying the laser cutter: http://www.chymist.com/Polymer%20Identification.pdf http://makezine.com/2011/09/22/identifying-unknown-plastics/
Do not cut any material that contains chloride as it is corrosive to both the machine and your body! These include PVC and vinyl.
Approved Materials[edit]
A new settings page is being created here: Laser Cutter Settings
DO NOT CUT/ENGRAVE[edit]
| Material | Hazard |
|---|---|
| Polycarbonate | Fire hazard |
| Lexan | Fire hazard |
| PVC | Chlorine |
| Cintra | Chlorine |
| Vinyl | Chlorine |
| ABS Plastic | Fire hazard, difficult to clean up |
| Pleather / Faux Leather | Chlorine |
| Epoxy Coated Fiberglass / Composites | Noxious fumes from epoxy |
| Printed Circuit Boards | Noxious fumes |
| Epoxy Coated Carbon Fiber | Noxious fumes |
| HPDE / Milk Bottle Plastic | Fire hazard |
| Any Material Containing Chlorine | Chlorine |
Usage[edit]
Reserving Laser Cutter Time[edit]
The laser cutter can be reserved for up to 3 hours at a time (two login sessions using your TinkerMill keyfob).
We use a Google Calendar system, with the laser cutter listed as a "room" that can be booked.
To view the laser cutter calendar:
- In Google Calendar, click the **+** next to Other calendars on the bottom left of the page.
- Choose **Browse resources**
- Search for and select TinkerMill Main Building-1-Rapid Prototyping-Laser Cutter (5). The Laser Cutter is under the heading TinkerMill Main Building
It will now appear alongside your personal calendar so you can see availability before booking.
To reserve time:
- Make sure you have completed laser cutter training.
- Open your Google Calendar while logged into your TinkerMill Google account.
- Create a new event during your desired time slot.
- On the right there is a panel with tabs ```Guests``` and ```Rooms```. Select ```Rooms```.
- In the Add rooms field, search for Laser Cutter and select it. The 4KW Laser in the W bay will also pop up, please don't mix these two up!
- Save your event. The room will be added and your booking is confirmed.
Tip: Please cancel your booking if you can’t make it so others may use the time.
Preparing Vector Files for Cutting and Engraving[edit]
We use LightBurn for our laser cutter CAD/CAM/control program. This program can be downloaded for free for a 30 day trial so makers can prepare their cuts on their own computers. Link to download Lightburn: https://lightburnsoftware.com/products/lightburn-pro. At the end of the trial period, you may purchase the software for 75% off the pro package price. Final price is currently around $50.00 and is a forever license. Discount code can be found in the Slack laser_cutter channel by right clicking on the channel name and selecting view channel details.
Using Lightburn for Laser Cutting[edit]
The file format native to Lightburn is .lbrn2 and opens them directly.
The laser cutter software also imports a variety of file formats:
Vector / mixed formats:
• .ai - Adobe Illustrator
• .svg - Scalable Vector Graphics
• .dxf - AutoCAD Drawing Exchange Format
• .pdf - Adobe Portable Document Format
• .plt / .hpgl - Plotter / Hewlett-Packard Graphics Language
The laser cutter software expects metric measurements. Export at an Artwork Scale of 1 unit = 1mm.
DXFs created with CAD software, such as Autocad, often has double lines or other undesirable artifacts like water marks from the conversion process. You should always open these files in vector drawing software and clean up any of these erroneous paths.
Make note of your document's size (in millimeters) as this will be useful later if resizing is needed in the laser cutting software.
The laser cutter software can import a variety of raster (image) formats. Raster formats are pixel-based formats used for etching pictures.
Image formats:
• .png - Portable Network Graphics
• .jpg / .jpeg - Joint Photographic Experts Group format
• .bmp - Windows Bitmap
• .gif - Graphics Interchange Format
• .tif / .tiff - Tagged Image File Format
A short LightBurn tutorial is available here.
Preparing Files With Adobe Illustrator[edit]
Preparing Files With Inkscape[edit]
Preparing Raster Images for Engraving[edit]
The Lightburn software has advanced features for converting images to grayscale or black/white.
Operating the Laser[edit]
The laser cutter controller and software was upgraded in early 2018. A re-certification is required for any members trained prior to 2018.
- Load file into Lightburn software.
- Turn the laser on using the key on the main control panel. Check to ensure that the Chiller, Air Assist Pump, and Ventilation Fan have all turned on. If any of these systems do not turn on, do not use the machine!
- Wait for the laser to complete its initialization process and has stopped moving prior to loading any materials into the bed.
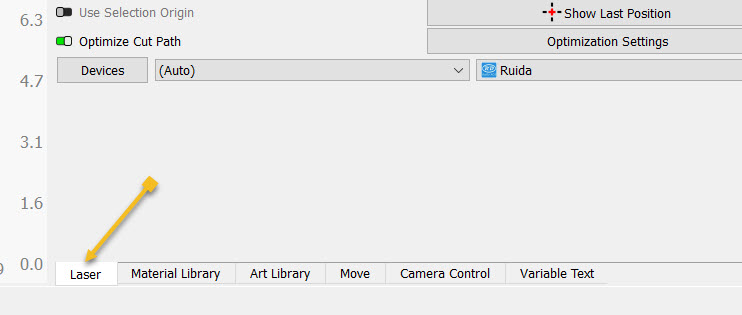
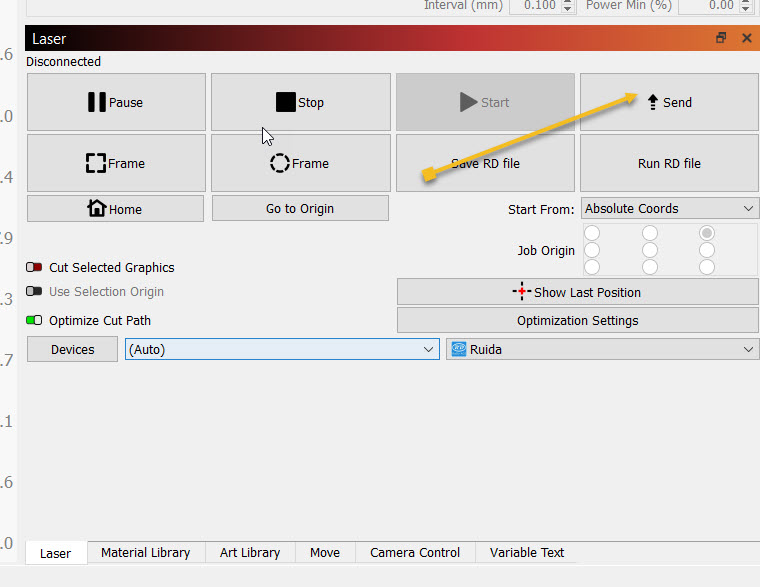
- In Lightburn use the "Send" button in the Laser tab of the windows in the lower right to send your file to the cutter. Please leave "LGHTBRN" as the name of the file you send to the laser, and overwrite any existing "LGHTBRN" file.
- Scan your badge using the TinkerAccess kiosk above the main control panel. The laser tube cannot fire if a certified user is not signed in. If additional time is required users may re-scan at any point to extend the session.
- Place your material onto the laser cutter bed.
- (Refer to picture of laser control panel below) The directional keys on the key pad are used to position the laser cutter's focal head. If the bed height needs to be adjusted this can be done by pressing the "Z/U" button on the keypad and with "Z MOVE" highlighted pressing the Right arrow to move the bed down, or the Left arrow to move the bed up.
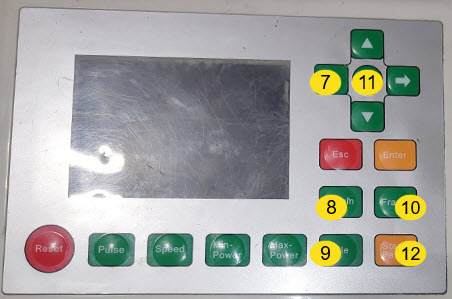
- Once the focal head is correctly positioned relative to your material, press the "ORIGIN" button on the keypad to lock in its current location as the origin point for your job.
- Press the “FILE” button to load the file to the laser cutter’s memory
- At this point "FRAME" can be used to physically outline the outer-bounds of the work area for your job. The laser head will travel in a rectangular pattern that represents the boundaries of your file.
- Now move the laser head so that the auto-focus probe is positioned directly above your material. Press the "Z/U" button and navigate to "AUTOFOCUS" and press "ENTER". It is crucial that the probe contact your material or the laser head may impact the bed and compress the focal tube. If you are going to miss your material with the auto-focus probe use the "ESC" key to stop the auto-focus process, or use the emergency stop to prevent the crash.
- You are now ready to cut/engrave! Press the “START” key to start the laser from your previously declared origin point.
- Monitor your job closely. If you want to inspect the quality of your cuts and engraves mid run you may do so by pressing the "Start-Pause" button. If you open the lid without pausing the run it will interrupt the beam but continue its motion.
- Listen for a loud beep to indicate that your job is done.
- Move the laser head back to the right rear corner and press "ORIGIN".
- Remove your material as well as any left over pieces. Don’t worry about scrap that falls through the the honeycomb, that gets cleaned out during maintenance. Do, however, remove any scrap that sits on or above the honeycomb that could obstruct material placed into the machine later. The vacuum cleaner next to the laser cutter works great for sucking up loose bits!
- Close lightburn if you are finished cutting.
- Donate money for the laser cutter based on the suggested rate and the elapsed time it took to run, according to the time displayed on the laser cutter. Suggested rate is currently $0.16/min or $10.00/hr. Using the Lightburn preview display, you can see the elapsed time for the project to engrave and cut. You need only pay for the time the laser is actually on.


Using the Rotary Attachment[edit]
This process is documented on a page of its own.
Cleaning and Maintenance[edit]
Please refer to http://www.rabbitlaserusa.com/Manuals/LaserMaintenanceSchedule.pdf for maintenance instructions.
Due to the delicate nature of the laser cutter, maintenance is to only be performed by trained members. Please do not attempt to clean or repair the machine without this one-on-one training and specific authorization. If you believe that the laser needs cleaning or other maintenance please send a message to info@tinkermill.org.
Lens Damage Examples[edit]

Focal Length Sensor Plunger[edit]
It is necessary to periodically clean the tip of the focal length sensor plunger. Because this plunger is used to set the focal distance of the laser, a build up of debris will cause this distance to be off enough to affect the quality of cuts and etchings.

Resources[edit]
Design Resources[edit]
- Rabbit Laser Manuals and Tutorials
http://www.rabbitlaserusa.com/ManualsTutorials.html
- Example Projects
- Living (or Lattice) Hinges
Material Resources[edit]
- Rubber Stamp Materials - Stamp Material - Laser Safe
Lightburn Software Tutorials[edit]
- Lightburn Software Tutorials - https://lightburnsoftware.com/pages/tutorials
- Lead In/Out discussion - https://www.youtube.com/watch?v=8QNKp-djV0I
- You Tube Channel with lots of files, machine reviews, and tutorials - https://www.youtube.com/@TheLouisianaHobbyGuy