4KW Laser

| Location: | Southwest corner outside of the main building known as W |
|---|---|
| Shop Captain(s): | Erik Akia |
| Shop Email: | 4kwlaser@tinkermill.org |
| Slack Channel(s): | #4KW Laser |
| Shop Usage Fees: |
|
Contents
Note[edit]
This page is under construction. Please contact neil.gabriel@tinkermill.org with comments and/or suggestions.
General[edit]
We were donated a Mitsubishi ML2512HV 4kw CO2 laser in 2023, members donated to upgrade our power to use it, and we are currently working toward finishing the final phases of that goal. Please be patient with us as it gets powered and as we integrate it into TinkerMill. We’re getting close!
Classes[edit]
Certifications will cost $400 (25% discount for members) and consist of two classes. The first class will cover computer work, file creation, post-processing, G-code, M-code, and loading .nc files onto the laser. The second class will focus on shop policy, safety, and the operation of the laser with various materials. You will receive the Laser Trainee designation after completing the two certification classes.
While a Laser Trainee, you must have an approved mentor present when using the laser until you advance to Laser Tech. The mentor will assist you if needed and assess whether you are ready to advance. The criteria for advancement will include safe operation and whether you still require the mentor’s help for essential tasks and information acquisition. We do not expect you to know everything to advance, but you should be able to use the machine safely and approach any issues or gaps in knowledge in a manner that does not endanger you or the machine. The certification fee will cover your first two hours with a mentor during your initial session, and subsequent hours will cost $25 each.
Shop Fees[edit]
All TinkerMill shops are self-funded and do not receive a portion of membership dues. Both members and non-members are required to pay for time spent in the shop and for materials that are used. The shop fees help pay for equipment maintenance and repair, shop supplies, and the purchase of new tools and equipment. The current rates are shown in the Info Box on this page (top-right corner) and are posted on a sign in the shop.
Payments by cash or check can be placed in the blue box in the shop. Please use one of the envelopes provided and write your name, the amount, and that it is for 4Kw Laser Shop before depositing in the box. Payments can also be made electronically via Venmo or at the kiosk at the front office.
The laser usage fee will be based on the laser-on time at $1.33 per minute. This rate may fluctuate as we better understand usage and costs as more people begin using the machine.
Donations[edit]
Cash donations are appreciated and accepted at any time. Payments can be made as described above for shop fees.
Donations of equipment must be approved by the Executive Director. Do not leave unapproved donations in the shop. Unwanted donations may be disposed of at the discretion of the shop captain and may be offered to the membership, donated to charity, or thrown away.
Below are some items that we could use in the shop. If you have any of these items to donate, please contact a shop captain:
Equipment[edit]
Below is a list of some of the equipment, tools, and supplies in the 4Kw Laser Shop. The shop has many additional tools and supplies that are too numerous to list.
We are always open to suggestions for other tools and supplies that would help to make the shop more useful. If you have something that you would like to donate, please contact a shop captain or the TinkerMill executive director first to discuss your donation. See the #Donations section above for more info.
Overview[edit]
Specifications[edit]
Laser Model: Mitsubishi ML2512HV (4kw CO2 laser)
Working area: 2400 x 1200 mm (96 x 48 inches)
Laser Kerf Width: 0.1524 mm (.006 inches)
Torch Height Control (metals only)
Parts of the Laser[edit]
4000 Watt laser tube - The laser tube lives in the Resonator. This generates a beam of unfocused infrared radiation.
Mirrors - Mirrors are located in the Resonator and on the Y carriage of this laser. They reflect the beam from the tube to the focal assembly or torch head.
Focal assembly - This is the business end of the laser. This assembly contains the focusing lens, the auto-focus assembly, red-dot laser indicator.
Auto-focus assembly - This laser is equipped with an auto-focusing area that allows it to touch off of a permanent surface and move itself into an optimal focal range.
Y carriage - the Focal Assembly moves with the Y axis to position the Focal assembly (towards or away from the control panel).
X carriage - the laser bed moves with the X axis to position the work piece under the Focal assembly (left to right as viewed from the control panel).
Z-axis - the Focal assembly is moved vertically along the Z axis.
Laser bed - The bed supports your material while also allowing exhaust to be pulled through the bed of the laser.
Chiller/Heater - A chiller constantly circulates cooled water through the outer layers of the laser tube to help prevent the tube from overheating and cracking.
Safety[edit]
- The high power laser beam can cause injury to the eye or burns if it is irradiated on the human body.
- Special care is necessary as the CO2 laser beam is an invisible far red infrared radiation having a 10.6μm wavelength. If the direct or reflective laser beam should contact the eyes or skin, damage to vision or burns could result, so never radiate the beam on the human body.
- ALWAYS WEAR THE PROVIDED SAFETY GLASSES ANY TIME THE LASER MACHINE HAS BEEN TURNED ON. Note that the laser beam (CO2) cannot be completely shielded even when wearing protective goggles or a protector. This also applies to the visible beam (red-dot laser indicator).
Machine Safety[edit]
- Do not open any section of the beam passage (beam duct, bend mirror, etc.), when radiating the laser beam.
- Before disassembling or inspecting the processing head and the bend mirror holder (removal, installation, etc., of nozzle, processing lens and bend mirror), stop the oscillation. Also, be sure to close the beam shutter that is provided at the outlet of the CO2 laser.
- As the 10.6μm wave length CO2 laser beam is not visible, the red-dot laser indicator beam (power : approx. 1 mW) is used to adjust the beam axis. However, the visible laser beam must not enter the eye because it also will cause damage to vision.
- Take special care to secondary reflection from metal surfaces. Especially take care when cutting copper or aluminum work pieces.
- If cutting chips or dust accumulate on the conveyor, exhaust duct or dust collector installed below the work table, the spatter and the beam could come in contact and start a fire. Thus, always remove these periodically and clean completely.
- Do not place flammable materials, explosive chemicals or gas cylinder around the laser processing system.
Usage[edit]
Scheduling Time on the Laser Cutter[edit]
The 4Kw Laser is a new tool here at TinkerMill, thus a Resource scheduling and reservation system has been set up with Google Calendar.
Preparing Vector Files for Cutting[edit]
We use SheetCAM for our laser cutter CAM program. This program can be downloaded for free as a trial so makers can prepare their cuts on their own computers. The trial software is fully functional with the only limit being the 180 line .NC code output. TinkerMill has a licensed version of SheetCAM that allows you to import the .job file from your computer so that a full .NC cut file can be created. Link to download SheetCAM: https://sheetcamshop.myshopify.com//pages/download-sheetcam. SheetCAM accepts .DXF and .SVG files from any CAD program.
Preparing .SVG Files With Inkscape[edit]
Operating the Laser[edit]
Start up[edit]
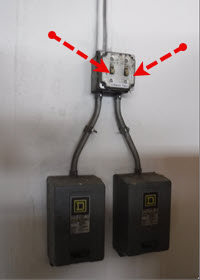
- Turn ON the wall switches for the exhaust fans.
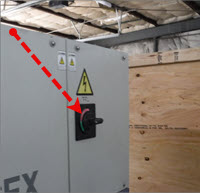
- Turn ON the main power supply circuit breaker on the Laser Resonator.
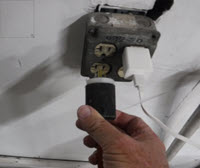
- Plug in the extension cord for the dust collector.
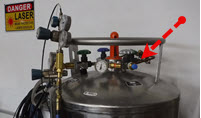
- Using gloves, open the main valve on the Nitrogen Assist Gas dewar.
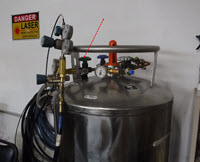
- Using gloves, open the Nitrogen Gas Pressure Builder valve to adjust above 350 psi if needed for cutting thicker materials.
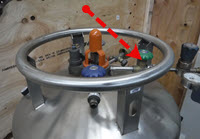
- Using gloves, open the main valve on the Oxygen Assist Gas dewar
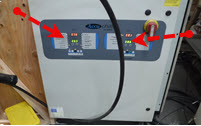
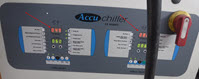
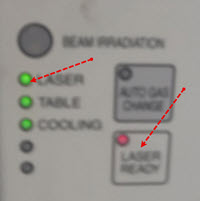
- Ensure the green and red reading on the chiller/heater are on. Red is current reading and green is target reading.
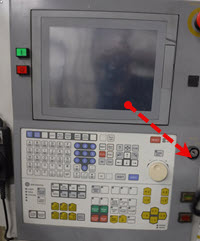
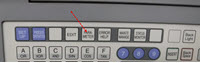
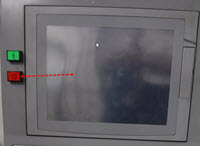
- Press the green ON button of the control panel.
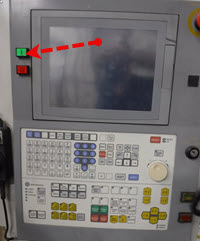
- Retrieve the machine key from the toolbox, insert in control panel and turn the READY key switch to the ON Position.
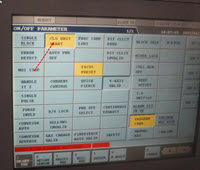
- Turn ON the chiller/heater unit from the Parameter screen. (CLG UNIT START yellow when on).
- Wait for chiller/heater to cool/heat to target temps.
- Press Laser Ready button. Laser light will flash and you will hear the resonator spin up.


Shut Down[edit]
- Press Laser Ready button off. Laser light will start flashing. Wait at least 2 minutes for the resonator and cooling system to complete their internal shutdown sequence.
- Turn OFF the chiller/heater unit from the Parameter screen. (CLG UNIT START blue when off).
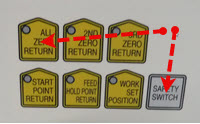
- Press the ALL ZERO + SAFETY SWITCH buttons to move laser bed to the load position.
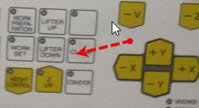
- Press the CLAMP button to unclamp the work piece and remove materials. Press Clamp button again to lower clamps.
- Turn the READY key switch to the OFF Position, remove and return to toolbox.
- Press the red OFF button of the control panel. Wait for the screen to go completely blank
- Using gloves, close the main valve on the Oxygen Assist Gas dewar
- Using gloves, close the main valve on the Nitrogen Assist Gas dewar.
- Using gloves, adjust the Nitrogen Gas Pressure Builder valve to adjust below 350 psi.
- Unplug the extension cord for the dust collector.
- Turn OFF the main power supply circuit breaker on the Laser Resonator.
- Turn OFF the wall switches for the exhaust fans.


