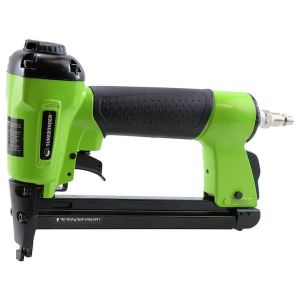
Surebonder 9600B
The Surebonder 9600B Pneumatic Staple Gun is an air tool located in the Textiles Shop. It can be used for upholstery work, framing, and similar projects. It provides superior performance for attaching fabric to wood compared to manual and electric staplers due to its increased driving force.
Contents
Specs[edit]
Operating Pressure: 60 - 100 PSI
Magazine Capacity: 100 staples
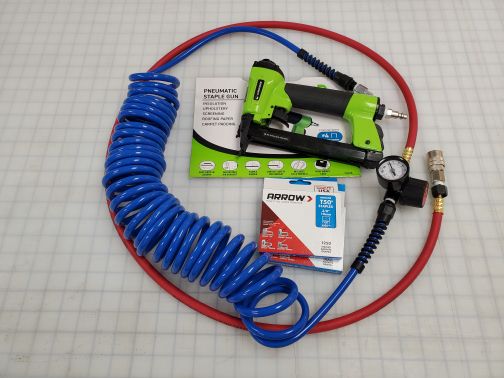
Staples: The Surebonder 9600B Pneumatic Staple Gun is designed to use a 20-gauge, narrow crown, heavy duty wire staple. Use only Arrow T50 Type staples in sizes 1/4”, 5/16”, 3/8”, 1/2”, 17/32”, and 9/16”.
Note: The Textiles Shop tries to keep a couple boxes of staples on hand for convenience. To ensure that there are enough staples in the right size for your project, you are encouraged to bring your own.
Safety[edit]
When using the staple gun, you must follow proper safety procedures.
- Eye protection is required. It is possible for a staple to deflect or break during the stapling process, causing small bits of metal to fly through the air. Be sure that you and those around you are using safety glasses or other eye protection before using the stapler.
- Hearing protection is recommended. The staple gun makes a loud sound that can be damaging to hearing. When using the staple gun for a prolonged period of time, it is recommended to use hearing protection, such as ear buds.
- The staple gun has a firing safety mechanism to ensure that the stapler does not fire when not in contact with a surface. Do not attempt to defeat the safety mechanism, and do not aim the staple gun at any person even with the safety mechanism in place.
Setup[edit]
The staple gun is rated for an operating air pressure of 60 – 100 PSI. The air coming from the TinkerMill central air compressor is pressurized to at least 120 PSI, which is too high for this tool. This means that you MUST use an inline air pressure regulator set to the correct pressure when using the staple gun. Failure to follow this rule may result in damage to the tool and possible injury to the user.
A length of coiled air hose, an adjustable pressure regulator, and a swivel extension hose are provided in the shop for use with this tool and other pneumatic tools that members wish to bring to use in the shop. Please do NOT disassemble this hose assembly. If you feel that you need a different set-up, please talk to a shop captain first.
Before connecting the staple gun to the air line, do the following 3 things:
- Ensure that the correct staples are loaded in the stapler for your project. For your safety, do not attempt to load or change the staples while the staple gun is connected to the air line.
- Place 3 drops of light machine oil in the air inlet. The pneumatic staple gun requires oiling before each use in order for it to work efficiently and to prolong its useful life. A small bottle of oil is included in the carrying case.
- Set the pressure regulator in the range 60 – 100 PSI. Do this BEFORE you connect the tool to the air hose. Do not exceed 100 PSI or you may damage the tool.
Loading Staples[edit]
- Make sure the staple gun is disconnected from the air supply.
- Only use the proper size and type of staple rated for this staple gun. (Arrow T50 Type, size 1/4” to 9/16”).
- Depress the track release lever on the handle to release the spring-loaded staple magazine. Slide the magazine out as far as it will go.
- To load staples, turn the staple gun upside down and insert a full strip of staples into the staple magazine with the staple points facing up.
- Slide the staple magazine closed until the track release lever clicks back into place. Closing the staple magazine while staples are loaded engages the spring load mechanism, so it will take slightly more pressure to slide the magazine closed.
Using the Staple Gun[edit]
- The Surebonder pneumatic staple gun is equipped with a contact safety mechanism. The staple gun will not operate unless the contact mechanism is firmly pressed against the surface to be stapled.
- Grip the body of the staple gun firmly, make sure that the contact mechanism is placed securely against the work surface, and then pull the trigger to drive a staple.
- Remove finger from the trigger and allow the recoil to remove the staple gun from the surface being stapled.
- To drive another staple, move the staple gun to the next area on the work surface and repeat these steps.
After Stapling[edit]
- Always disconnect the air hose from the staple gun using the quick connect adapter. Do NOT remove the quick connect adapter from the staple gun. Because the air line is under pressure, there will be a brief, but sudden burst of air released when the tool is disconnected. This is normal.
- Remove all staples from the staple magazine and store in the appropriate box.
- Store staple gun and accessories back in the storage box and place back on the shelf.
Clearing a Jam[edit]
If the stapler jams, please stop using the tool until the problem can be corrected. Do not try to force it. If you have experience with clearing jams from pneumatic staple guns, then you may clear the jam yourself. Otherwise, contact a shop captain for assistance.
Other Notes[edit]
Please do NOT use an air gun to blow off the cutting table. This only blows the dust and dirt into other parts of the shop where it can accumulate in the sewing machines, materials, etc. Always use the bench brush to brush debris into the waste basket and use a lint free micro-fiber cloth for final cleanup.

