Difference between revisions of "Embroidery 6Needle"
m (→DST Settings) |
m (→DST Settings) |
||
| Line 427: | Line 427: | ||
If you are using a DST formatted stitch file, there is no color information in the file and you will have to manually assign a color to each stitch section. | If you are using a DST formatted stitch file, there is no color information in the file and you will have to manually assign a color to each stitch section. | ||
| − | Additionally, a DST file has a sequence of "jump" stitches that are used to traverse from one area of stitching to the next. Using the Settings on page 2, you can can convert the jump stitches to a trim command. However, you need to match the number of jump stitches to that used when the file was originally created. For this reason, it is better to use a PES formatted file if you have the opportunity to do so. | + | Additionally, a DST file has a sequence of "jump" stitches that are used to traverse from one area of stitching to the next. Using the Settings on page 2 (and page 149 in the Operations Manual), you can can convert the jump stitches to a trim command. However, you need to match the number of jump stitches to that used when the file was originally created. For this reason, it is better to use a PES formatted file if you have the opportunity to do so. |
=== Setting Manual Stops === | === Setting Manual Stops === | ||
Revision as of 10:23, 24 July 2019
Contents
- 1 Introduction
- 2 Steps Before Embroidery
- 3 Importing Designs from PC or External Media
- 4 Embroidery
- 5 Applique
- 6 Cap Frame
Introduction
This Wiki describes the Baby Lock EMP6 on loan to TinkerMill. Its sister machine is the Brother PR600. They have different built-in designs. Otherwise, they are functionally equivalent.
You can embroider designs with multiple colors. Designs with 6 or fewer colors will not require any thread changes once the machine has been set up. Designs with more than 6 colors will require re-threading the machine as needed.
The display is a touch screen. Please use either your finger or a simple plastic stylus and be gentle! This is an older machine so it sometimes takes longer to respond than you would like.
Available Hoop Sizes
Supported hoop sizes are:
- 40 mm x 60 mm (1-1/2" x 2-3/8") - good for small monograms
- 100 mm x 100 mm (4" x 4") - good for many logos
- 130 mm x 180 mm (5-1/8" x 7-1/8")
- 200 mm x 300 mm (7-7/8" x 11-3/4")
There is also a cap frame for designs that are 50 mm x 130 mm (2" x 5 1/8").
Supported Embroidery Thread Types
The manufacturer suggests the use of 40 weight polyester or rayon embroidery threads. You are asked to use only the embroidery threads provided in the textiles shop. General purpose sewing threads are not to be used for embroidery.
Many different brands of thread have been used successfully on this machine. However not all threads will perform well due to age or other issues. Please pay attention to the machine during embroidery in case the machine runs into any problems.
Supported Stitch File Types
The machine will read PES, PHC (less common), and DST formats. If the embroidery design is larger than will fit in the largest supported hoop size, it will NOT be recognized by the machine.
And as a note, DST formats carry no color information in them.
Certification
You will need to be certified on the 6-needle before you can use it with the standard hoops. An additional certification will be required to use the cap frame.
Manuals from Brother
The original Baby Lock Operations Manual and Quick Reference Manual are located in the plastic box labeled "Baby Lock 6-Needle". You can download PDFs of the Brother equivalents here:
- PR600 Operations Manual
- PR600 Quick Reference
- PR600 Service Manual (to be used by shop captains only)
Steps Before Embroidery
Turn on Machine and Oil the Raceway
The power switch for the machine is on the base on the right hand side towards the back.
After the machine is on, you will be reminded to put a drop of oil on the raceway before embroidery. Please do this. You can use the precision oiler located in the 6-Needle Embroidery box. Only one drop is needed!
At the same time, check for lint. You can use the brush and the tweezers in the small accessory box to clean out the bobbin area.
You will be warned that the embroidery arms will move. Press OK and let the machine do its thing.
You will then be shown the opening screen. From here, you can import your design(s) and start setting things up for embroidery.
Operations Flow
There are several steps you will go through before you can actually start sewing:
- Select / create a single design (import from PC or other media such as floppy disk or choose from built-in) and press "Set"
- Merge other designs (if desired) and arrange them followed by selecting "Edit End"
- Edit the combined designs (if desired) followed by selecting "Sewing"
- Thread each needle with the directed color and press "Unlock" when ready to sew
There is an overview of this basic operation flow on page 22 in the Operations Manual.
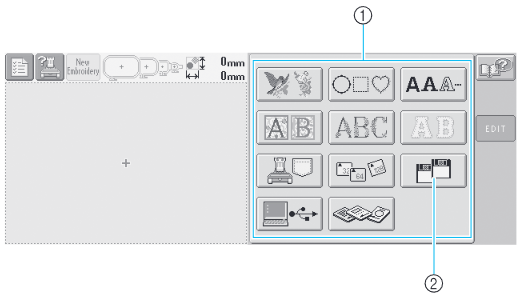
(1) Selecting Built-In Designs
From top to bottom, left to right:
- Row 1
- Built in designs (last design on last page is a tension test design)
- Built in decorative frames
- Letters (from which you can create words in 3 different sizes)
- Row 2 (different from what is shown above)
- Fancy script letters
- Multi-colored fancy letters
- Monograms
- Row 3
- Retrieve patterns from built-in memory (i.e. the "pocket")
- Retrieve patterns from Compact Flash card
- Retrieve patterns from floppy disk
- Row 4
- Retrieve pattern from connected PC
- Retrieve pattern from Brother Embroidery Card
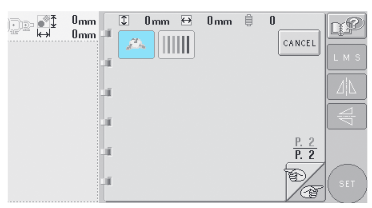
There are several pages of built-in designs. You can page through them by selecting the "hands" buttons as shown below. You can tap on each design to see a preview. Once you have a pattern selected, press "Set".
Creating Words
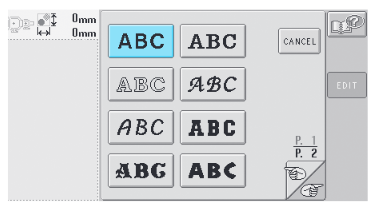
From the main screen, choose the letters button on the top row. Then choose a font to use.
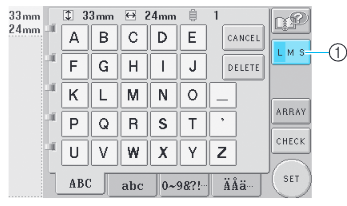
Then choose individual letters to form a word. Be sure to select the size you wish to use right after you select your first letter. The button to select the size is "LMS" (Large Medium Small) on the right side of the screen.
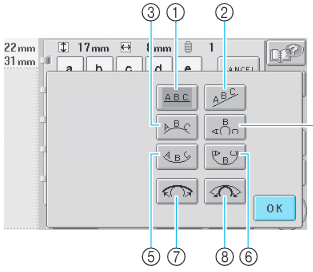
If you select the "Array" button on the right side of the screen, you can put your word on an arc or a slanted line. You can adjust the curve using the two buttons shown on the bottom of the next screen.
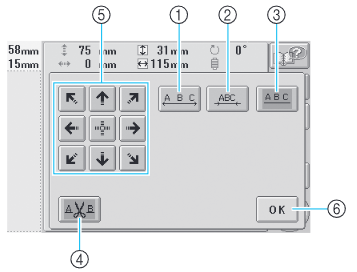
When you are finished, select "OK" or "Set" depending on which screen you are on. You will have more options to change the letter spacing and the colors of the letters on the next screen.
Creating Monograms
Creating monograms works in a similar fashion. You use the tabs at the bottom of the letter selection screens to choose your left, middle, and right letters. Then select "Set".
(2) Editing Designs and Merging New Ones
After you have selected a design or created a new word or monogram and hit the "Set" button, you will come to the following screen.
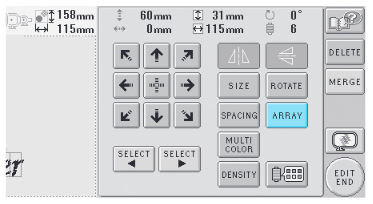
From here, you can merge (or add in) new designs and you can edit the individual designs in your collection to form a new arrangement.
Select between your designs using the left and right arrows labeled "Select" at the bottom of the screen.
For each design, you can move the design around using the 3x3 grid of arrow buttons on the left side. Hitting the center button will return the design to the center of the hoop.
You can reflect your design, resize it (within a small range), or rotate the design. If the selected design is a word or monogram, you can adjust the spacing between letters by selecting the "Spacing" button.
Notice button (4) in the lower left. You can choose to have the machine cut the threads between each letter by selecting this button.
Referring back to the prior image...
You can put the word on a slanted line or an arc using the "Array" button.
If you wish to choose a different color for each letter in your word or monogram, select the "Multi Color" button.
Select the "Density" button to change the density of the stitching. Density is relative to 100% so it is not really clear what the actual range of values is in, say, stitches per mm.
Select the button in the lower right with the thread icon to change the colors in your design.
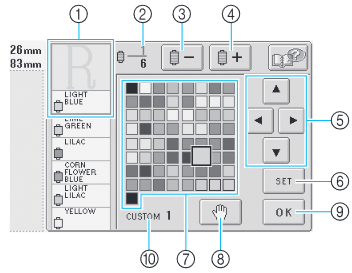
Item (2) refers to the total number of color changes in the denominator and the current color in the numerator. You can navigate between color changes using buttons (3) and (4). To assign a new color to the current selection, use the arrow buttons in (5) and then press the Set button (6). If you forget to Set the color, your new selection will not be saved. The color palette in (7) is typically the Brother Embroidery colors. You can create custom palettes as is suggested by (10), but that is not covered in this Wiki. You can consult the Operations Manual for more information. If you would like the machine to stop before it sews the current selection, press the hand button (8).
When you are finished choosing new colors, press the OK button.
If you wish to resize the design, select the "Size" button.
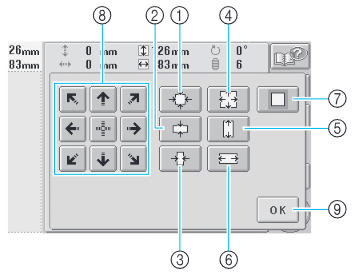
The buttons on the left side of the panel allow you to shrink or expand your design (within some limit) in each direction independently or in both directions. If you want to return the design to its original size, use button (7). When you are finished select OK.
(3) Editing the Designs as a Group
After you have merged as many designs as you wish, select "Edit End". You will come to the following screen.
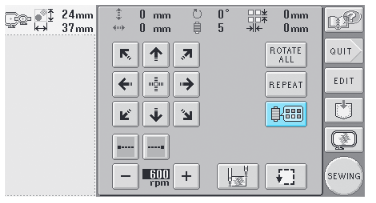
Now you can edit the designs as a group. You can also save the design (use the "pocket" button), return to the previous edit screen (use the "Edit" button), preview the design (use the "hoop" button) or cancel all of your current work (use the "Quit" button).
Move the combined design around using the 3x3 grid of arrow buttons.
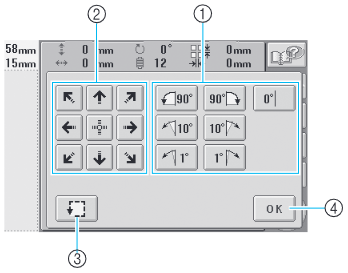
You can rotate the designs as a group using the "Rotate All" button.
Note button (3) - this is the framing button. It causes the hoop (if attached) to be moved so that you can see the general outline of the area that will be stitched. It is like the "Frame" button on the laser cutter. To follow the outline, keep an eye on the needle that is currently in the sewing position.
Press the "OK" button when you are finished with rotation.
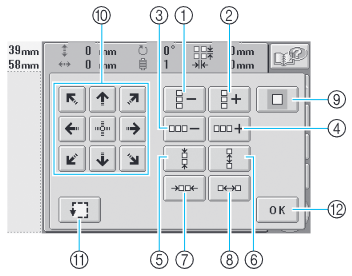
Use the "Repeat" button in the prior image to duplicate your design.
Uses buttons (1) to (4) to increase and decrease the number of repetitions in the horizontal and vertical directions. Use (9) to return to just a single copy of the design. Buttons (5) to (8) will increase and decrease the spacing between repetitions in the horizontal and vertical directions. Select "OK" when you are finished.
Going back to the first image in this section, you can change thread colors as we have mentioned before.
The two buttons with the dotted lines and the little squares are for turning on and off automatic lock stitches. The one on the left is for adding a lock stitch at the beginning of a new sewing section (i.e. right after a thread trim or the start of a new color). The one on the right is for the end of a section (i.e. right before a thread trim). These are good settings to have on unless you know that your design was digitized with lock stitches.
The sewing speed is controlled by the "+" and "-" buttons. Please leave the machine speed at 600 rpm even though it can sew faster. You will get a nicer stitch-outs at slower speeds and place less stress on the thread.
The button with the square and two needles at the corners is for connecting designs automatically. This is described starting on page 87 in the Operations Manual and is beyond the scope of this Wiki.
When you are finished editing your design as a group, select the "Sewing" button.
(4) Sewing
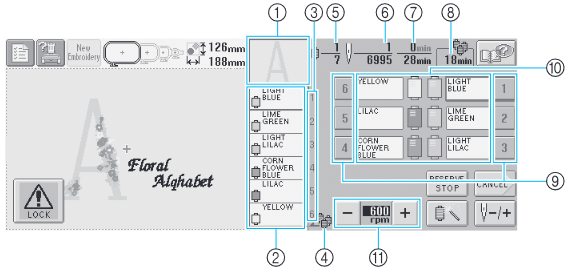
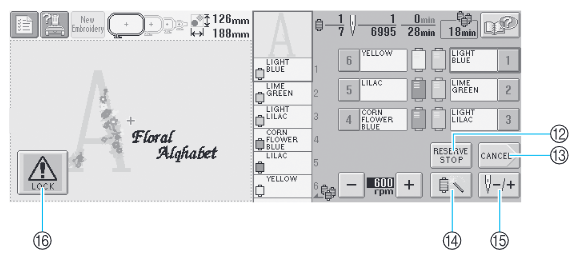
After selecting "Sewing" in the previous step, you are presented with a new screen. The following are two presentations of the same screen.
The machine will prompt you to change or load the threads you need (not shown above). Press OK and then proceed with changing the threads. Select the number next to each thread color (9). The machine will position the selected needle over the sewing arm. In this position, you can use the automatic needle threader. Changing the thread is covered in a different section below.
Items (1), (2), and (3) show you which section will be stitched next, the colors coming up and their associated needles. Item (4) indicates that the machine will stop after sewing Yellow and prompt you to change threads.
Item (5) tells you how many color changes there will be (in the denominator) and which color we are currently sewing. This is not the needle position.
Item (6) tells you the total stitch count in the denominator and the total number of stitches sewn so far in the numerator.
Item (7) gives you the total expected stitching time in the denominator and the amount of time already spent stitching in the numerator. I find that these values are just estimates and usually underestimate the time sewn and time remaining.
Item (8) tells you how long to before the next thread change.
Items (10) tells you which thread colors belong on which needle and the buttons in (9) will cause the machine to reposition the selected needle over the sewing arm.
Item (11) is the sewing speed. Please leave this at 600 rpm.
The "Reserve Stop" button (12) can be pressed while the machine is sewing. If you do so, the machine will stop *after* the current color is finished. At that point, you can override the color assigned to the next section to by selecting button (14) and choosing the next color to sew with.
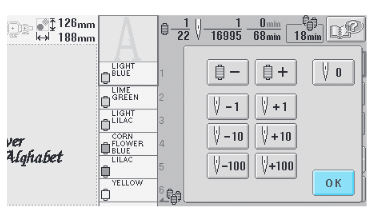
Button (15) can be used to move forward or backward a number of stitches (see below). You can also skip to the next color or go back to a previous color (use the buttons with the spool of thread and + or -). The needle with the "0" takes you back to the beginning of the design. You will use these options when you have a thread break or any other kind of stoppage that requires you to cut the threads and start over again a few stitches back.
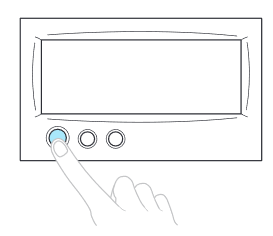
When you are sure all of your threads are loaded and no thread tails are hanging in a safe location, you can press the "Lock" button (16). The Start/Stop button will turn green (shown below). You can press this button and begin sewing. Stop the machine at any time and continue by selecting Start again.
The middle button is the thread trimming button. Press once to trim the threads. The right button is the needle threading button which is discussed later.
Importing Designs from PC or External Media
You have three options:
- transfer from PC using USB cable (easiest)
- transfer from floppy disk (2HD Windows Formatted only)
- transfer using the Brother Embroidery Card (there is only one so don't lose it!)
PC Transfer
Make sure the embroidery machine is connected to the Textiles PC. On the PC, there should be a USB Drive with either no files or only embroidery files on it. If the SE400 is also on, there may be two USB Drives available. You can copy embroidery files to the USB Drive. These will be accessible from the embroidery machine.
From the embroidery machine, select the PC/USB button. In the next window, choose your embroidery file to sew.
2HD Floppy Disk
To transfer via floppy disk, copy your embroidery files (PES, PHC, or DST format) to a 2HD Windows formatted floppy disk. Files saved in folders will NOT be displayed on the embroidery machine. Only insert or remove floppy disks while the floppy disk icon is in the display or while the embroidery machine is OFF. Once the floppy disk has been inserted, you can choose designs from your disk to embroider. See pages 117-118 in the BabyLock Manual. As of this writing (7/2019), the floppy disk drive on the embroidery machine has not been recently tested.
Using the Embroidery Card
To use the Embroidery Card, you will need to use the PE Design NEXT Software and its "dongle" on the Textiles PC to compute. This will be covered in the PE Design training.
Embroidery
Managing Threads
When you purchase or create your own design, chances are you have specific thread colors in mind. Purchased designs are often created with a certain manufacturer's thread line. And you may have had certain colors in mind when you created your own design.
The reality is that you need to stitch your design with the colors available whether at TinkerMill or elsewhere. At TinkerMill, we have the official Brother colors plus some extras. There are really only 61 Brother colors displayed on the EMP6. There are options to create your own custom palettes (presumably to match the colors you have on hand) and you can change the displayed colors to that of a few other manufacturers. However, these color palettes are likely not up to date.
When you load in your embroidery design, the machine's software will do the best it can to choose what it thinks is a close match to your color. (If you are using a DST formatted stitch file, there is no color information contained in the file.) It is likely that the machine will choose colors that don't look quite right to your eye. You can do one of two things. You can set the colors by hand for each section of stitching. This will make the displayed embroidery design look closer to the final product. Or you can completely ignore the assigned colors on the machine, knowing that you need to put the correct color on each needle based on the assignment of needles to stitching sections. The machine has no idea what color you are using with each needle and doesn't care so it is up to you to get this right.
The key here is to know what color you should be using for each section of stitching. It is extremely helpful to have a print out (or other electronic form of the same) that shows the stitching order and the stitching colors. Use this to choose the actual thread colors you will be using in your design.
Color Names and Numbers
The machine is typically set up to display just the name of the Brother Embroidery color. However, the TinkerMill spools have color numbers. You can see the thread color number instead by using the Settings button and switching to "Embroidery" instead of "Name of Color". See page 145 in the Operations Manual.
The Settings button is in the upper left corner of most screens. The only time you cannot access the Settings is during sewing.
Reusing Threads Already Loaded
If you already have colors loaded on the machine that you would like to use in your next design to sew, you can "lock" the thread to the needle. The machine will remember these locked colors and will not require you to reload the same color on a different needle for your next design.
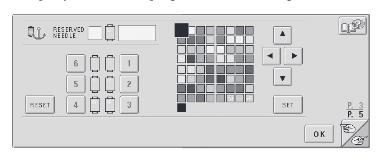
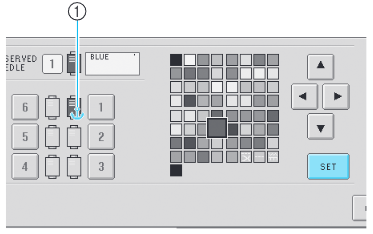
To lock or unlock colors to needles, go to page 3 of the Settings (and page 94 in the Operations Manual). Select the needle you want to lock. Choose the associated color from the palette to the right and hit "Set".
An anchor will be displayed with the locked needle indicating that the color is now locked to the needle. It will remain in this state even after the machine is turned off and on again.
Changing Threads
Changing threads is easiest to do when you have the tail of the old thread to work with. In this case, tie the new thread to the old with a single knot. Make sure it is snug. Pull the old thread out of the eye of the needle. Then gently but firmly pull the thread through until the new thread makes an appearance. Pull out about 8" of the new thread and snip off the old thread. Then thread the needle following the procedure in the next section.
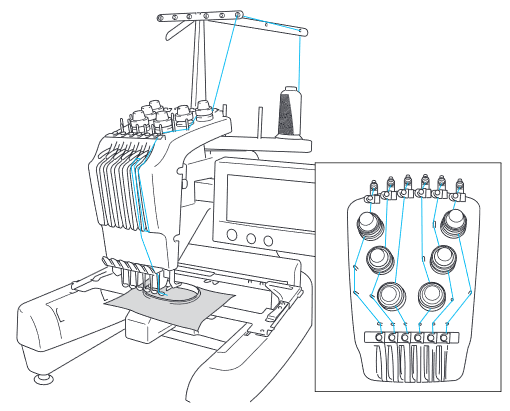
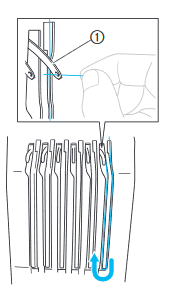
And if you need to thread the machine from scratch, see the instructions in the Operations Manual starting on page 35. The machine has some guidelines on it to help. Threads need to go under the little metal clips. Be sure to keep the thread on the correct indicated side of the metal posts.
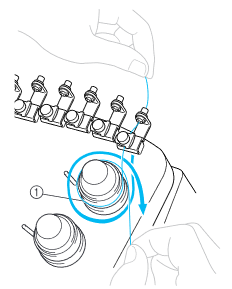
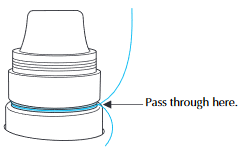
Be sure to wind the thread around the tension disks just once in the correct direction.
There are two metal plates under the tension knob and the thread needs to pass between them.
When threading the front of the machine where the uptake levers are, make sure the thread is sitting in the proper channels and is not caught on anything.
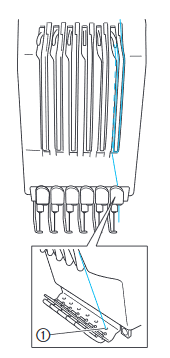
Pass the thread through the small hole above the needle.
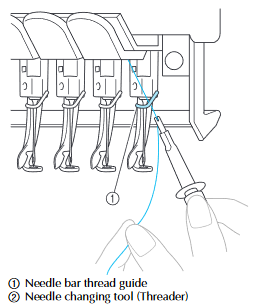
Use tweezers or the needle changing tool to get the thread over the hook.
If the thread is not installed properly, the machine will likely sense a tension problem and stop. You will then need to carefully inspect the thread path.
Threading the Needle
Needles can be threaded by hand with a good eye and steady hand. You can also use the automatic needle threader. This is described starting on page 39 in the Operations Manual.
Generally speaking, you need to select the needle to thread. The machine should reposition itself so that the needle is in the sewing position (over the embroidery arm). Pull out a good length of thread from the bottom, maybe 8" or so. Press the needle threading button on the display (this is the right-most physical button just below the touch screen).
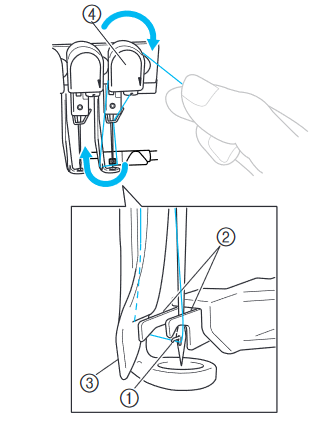
Items (1), (2), and (3) shown below become engaged. The forks (2) should be on either side of the needle.
Then lay the thread across the needle under the forks from right to left and to the left of (3). Pull the remaining tail up and over the thread cutter (4) and cut the thread by pulling down in the direction shown. Then press the needle threader button one more time. The thread should be pulled through the eye and up into the thread catch behind the needles. If the thread tail is hanging loose, just hook it up and over the cutter (4) and leave it there.
Bobbins
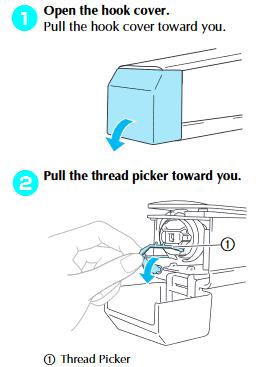
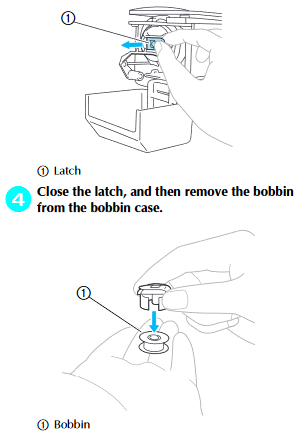
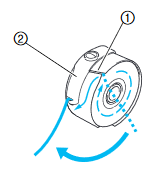
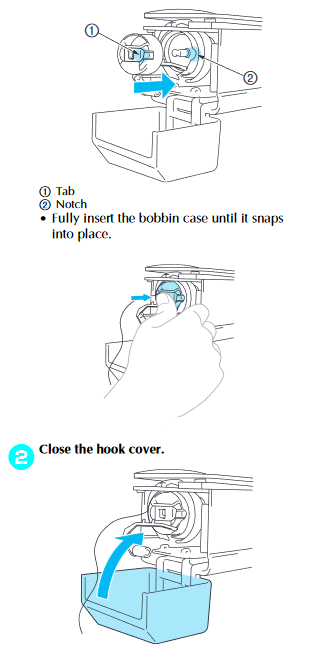
When the bobbin is empty, the machine will automatically detect this situation and will stop. Go ahead and cut the threads. There is no need to remove the hoop! Just reach underneath your sewing and remove the bobbin case and the bobbin from the machine. (See page 18 in the Operations Manual). Be gentle with the thread picker. It does not need much to move it out of the way.
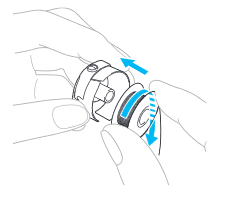
We use magnetic pre-wound bobbins. They can be found in the 6-needle embroidery box in a cardboard box marked "Bobbins". Select either white or black. The magnetic core forces you to insert the bobbin in the correct direction as it sticks to the bobbin case when properly inserted. Please return the empty magnetic core to the box as these can be returned to the manufacturer to be reused.
Install the new bobbin in the case and return the case to the machine. Leave about a 2" tail. It will stick out of the bobbin cover, but that is okay.
Go back a few stitches (about 20) and restart your sewing.
Changing Needles
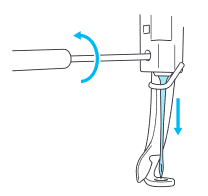
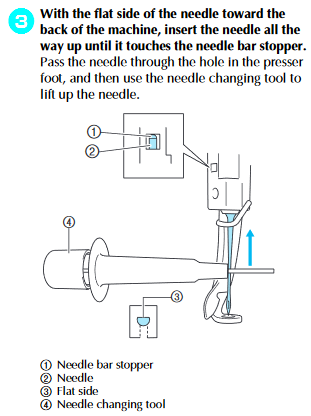
If you need to change any of the needles, you will need to use two tools that are in the small toolbox. One holds the needle in place and the other loosens the screw holding the needle in. Loosen this screw only as much as you need, otherwise a small piece will fall out and likely be lost. Instructions are on page 61 in the BabyLock Operations Manual. You will need to have the hoop OFF in order to change the needle.
Extra needles are in the small toolbox. Please record in the Maintenance Records the date you changed the needle and the needle number.
Recommended needle types are Organ HAX 130 EBBR or Schmetz 130/705 H-E.
Stabilizing the Fabric
There are many types of stabilizers and the right type to use depends on several factors
- Type of fabric
- Stitch count / density of design
- What you need the finished backside to look like
- What you need the front side to look like
Here is a list of common types of stabilizers
- no-show fusible mesh (lightweight fusible)
- medium weight cut-away or tear-away (fusible or not)
- paper-backed sticky stabilizers (cut-away or tear-away)
- water soluble film stabilizers (light and heavy weight)
- water soluble mesh lightweight stabilizers (fusible or not)
Generally speaking, you want the fabric to be as stiff as possible during embroidery. For light, airy designs with few areas of dense stitching, you'll need less stabilization than a denser design. Dense stitching will tend to increase the amount of puckering that occurs so the fabric needs to be held in place more strongly.
For example, if you are sewing a dense design on a light T-shirt, you will need the fabric not to shift during embroidery so you'll likely want to use a fusible stabilizer with enough weight to support a lot of stitches. (You can double-up on light-weight fusibles to make it heavier overall).
If you are sewing on a stiffer fabric like canvas, you'll need less stabilization and it wouldn't have to be a fusible.
If you need the backside to be clean (i.e. minimal to no stabilizer showing after embroidery), then you could use a tear away or water soluble stabilizer. A tear away works nicely when your design allows you to remove it in big chunks.
If you don't need the backside to be perfectly clean, a cut-away stabilizer works nicely.
If you need to keep the fabric from shifting, you will need to use a fusible, paper-backed sticky, or water stick stabilizer. Fusibles are the most common and are applied with an iron. Be careful to look for the slightly shiny side - that is the side with the fusible. You don't want to fuse the stabilizer to the iron.
Some fabrics like towels or Minky are difficult to hoop and can be held in place with a paper-backed sticky stabilizer. Only the stabilizer is hooped. The protective paper covering is removed after hooping and the fabric is pressed onto the sticky paper. Sometimes the weight of the fabric still tends to pull the fabric away from the adhesive. In those cases, you can try using the binder clips to hold the fabric to the sides of the hoop. Or you can try pinning the fabric to the stabilizer well away from the anticipated sewing area.
If the embroidery is to be done on fabric with some pile (like a towel or Minky), then you will want to use a light weight water soluble stabilizer on the top. These can be applied during hooping (though your paper pattern would be trapped underneath it) or they can be applied after hooping and pinned in place. Keep those pins well away from the sewing area! The water soluble stabilizer will help keep the stitches from falling into the pile. If this ends up not being enough, you could use tulle as a "topper". You need to select a color that matches your fabric. After sewing, you would need to tear the tulle away from the design.
For free-standing lace (FSL) designs you would need to stitch on heavy weight water soluble stabilizer. You can use a few layers of lighter weight water soluble stabilizers as well.
Note: If you find during stitching that you need more stabilizer, you can "float" a sheet under the hoop. To do this, stop the machine and have it cut the threads. Take a piece of stabilizer and cut it to the right size. Slip it under the hoop, roughly centered. Go back about 20 stitches and restart the sewing.
Hooping
Select a stabilizer to use and apply it to your fabric. Now we can proceed to hooping.
If you are trying to embroider your design at a specific location on your fabric, then I suggest the following. Print your embroidery design at full resolution. You can use the XXX software on the textiles PC to do so. The printed version should have a set of lines marking the center of the design horizontally and vertically. Cut around the design and the center lines. Pin the paper copy of the design onto your fabric where you want it to embroider. Pin it in at least a couple places.
Now take the top hoop (the one with the arms extending to the sides to attach to the machine) and center it over the fabric. Line up the center lines of the design with the center lines on the insides of the hoop. Carefully grab the fabric and the hoop together with both hands, trying hard not to shift the fabric. Now locate the bottom hoop and press the top hoop/fabric into the bottom hoop. Try to keep the fabric from rotating. If you end up with the design shifted somewhat, that's okay and can be compensated for on the machine.
The bottom hoop needs to just remain level with the bottom of the top hoop. There's no need to push it up any higher. Tighten the screw.
Attaching the Hoop
Each hoop has arms that extend a different amount. You may need to change the position of the embroidery arm on the machine for the hoop you want to use.
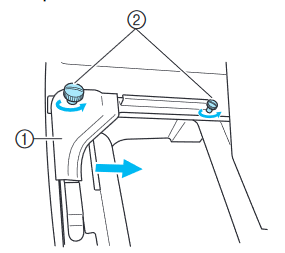
Only the left embroidery arm can be adjusted. Locate the two knobs on the back of the left arm and loosen them. Then shift the arm left or right as needed. The arm will click in place at one of several positions. Choose the one that fits the hoop you are using. Tighten the two knobs.
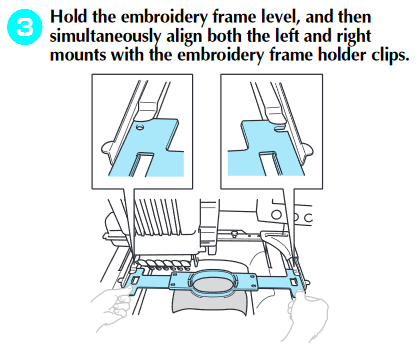
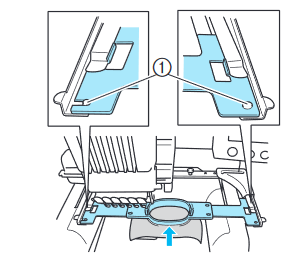
To attach the hoop, slip the ends under the clips until the hoop snaps into place on the posts.
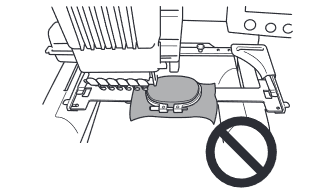
If you consider that the hoop forms a bucket, make sure that the bottom of the bucket (where your fabric is) is down. Do not attach the hoop like this:
If you have the option, try to keep as much loose fabric to the front of the machine as possible. This may mean that you end up embroidering your design upside-down. That is fine. You can shift and rotate your design on the machine.
Insert the two sides of the hoop under the metal clips on each arm. They should lock in place.
Clear the sewing area under the hoop! Secure the fabric behind the hoop. If you have a lot of loose fabric behind the hoop, you might want to use some binder clips to hold the fabric bunched up and in place so that it doesn't interfere with the embroidery. There are binder clips in the 6-Needle Embroidery box. You can do a frame check to make sure the embroidery arm can move freely and the loose fabric is out of the way.
Remove the paper design and all pins from the hoop and you should be ready to sew.
Sewing Speed
The machine can stitch from 600 to 1000 rpm when using the embroidery frames. However, it will do a better job stitching at slower speeds and will cause less wear and tear on the machine. Please keep it set at 600 rpm.
If you are using the cap frame, the suggested sewing speed is 400 rpm. Cap frame embroidery requires separate certification.
DST Settings
If you are using a DST formatted stitch file, there is no color information in the file and you will have to manually assign a color to each stitch section.
Additionally, a DST file has a sequence of "jump" stitches that are used to traverse from one area of stitching to the next. Using the Settings on page 2 (and page 149 in the Operations Manual), you can can convert the jump stitches to a trim command. However, you need to match the number of jump stitches to that used when the file was originally created. For this reason, it is better to use a PES formatted file if you have the opportunity to do so.
Setting Manual Stops
Start Sewing!
Finished!
When you are finished sewing, clip the threads right above the spool, leaving the tail hanging. Return the spools to the thread rack and please attach a small blue clip to the end of the thread to keep it hanging down.
Troubleshooting
It's easy to stop the machine while it is sewing - just press on the XXX button. At this point you can just continue start it up again. Or you can cut the threads by pressing XXX, going back a few stitches using the XXX buttons, and starting up again.
If there happens to be a power outage during stitching, the machine will remember what it was doing. The next time it is powered on, you will be asked if you want to resume sewing. If you choose to, you might want to cut the threads, go back about 20 stitches, and start up again. This gives the machine a chance to catch the bobbin thread.
Thread Nests
This is the most common sort of error you may run into. You may end up with a big wad of tangled threads under your hoop. The machine will detect that it can no longer move freely and will usually stop.
Taking care of this problem usually involves carefully lifting up the hoop to peer underneath it. There is no need to remove the hoop yet (and you probably can't anyway). You will need a nice sharp, flat blade to slice through the thread nest. (We really need a hook and knife set XXX!!!) Once you have the threads detached, remove the hoop from the machine and clean up all of those loose threads. You will also need to clean out the bobbin area of all loose threads. If you can't get to all of them from the bobbin area, you may need to remove the needle plate and clean it out from the top.
Once everything is cleaned out, re-insert the bobbin, reattach the hoop to the embroidery arm, go back a few stitches (or more), and start over again.
Needle Breaks
If the needle breaks, you will need to insert a new one. But first, snip the thread and pull through a long tail. Remove the broken needle. If part of the needle appears to have been lost under the needle plate, you will need to locate the errant piece and remove it.
Remove the broken needle by XXX, locate a new one in XXX, and replace it in the machine by doing XXX.
