Difference between revisions of "Industrial Sewing Machines"
m (Added links to the new Juki and Kingmax pages and added a See Also section.) |
m (Added paragraph about thread kept in stock with link to new page.) |
||
| Line 47: | Line 47: | ||
|- | |- | ||
|} | |} | ||
| + | |||
| + | The shop keeps an inventory of sewing thread in various weights and colors for use by members. Check the [[Sewing thread]] page to see what we currently have in stock. Of course, you are welcome to bring your own if you need something specific for your project. | ||
==Preparing the Machine for Sewing== | ==Preparing the Machine for Sewing== | ||
Latest revision as of 12:48, 24 May 2023
The Textiles Shop has two industrial sewing machines: a Juki 1541 and a Kingmax 1541S. Certification training is required before using these machines.
Contents
Machine Tips[edit]
- Needle type for all materials besides leather - 135x17
- Leather needle type - 135x16
- Using a regular needle on leather can rip the leather or leave holes
- Bobbin - type M
Before You Sew[edit]
You must be certified on this machine to use it. Look for a certification class on MeetUp or refer to the sewing Slack channel (#sewing-embroidery).
Choose the appropriate thread size for your selected needles. Use the excellent chart below to determine what size thread to use. If you are sewing leather, you will probably be using a size 16 or 18 needle. You can refer to this document if you are interested in learning more about needle to fabric pairings. As a further reference, but sure to look into the Coats Information Hub.
| Thread Size | Needle Size |
| 33 | 14-16 |
| 46 | 18-19 |
| 69 | 20-21 |
| 92 | 20-22 |
| 138 | 22-24 |
| 207 | 24-26 |
| 277 | 26-28 |
| 346 | 26-28 |
| 415 | 30 |
The shop keeps an inventory of sewing thread in various weights and colors for use by members. Check the Sewing thread page to see what we currently have in stock. Of course, you are welcome to bring your own if you need something specific for your project.
Preparing the Machine for Sewing[edit]
Threading the Bobbin[edit]
Threading the bobbin can take place while sewing but does require a second cone of thread. The lever pops up when the bobbin is full.
Threading the Machine[edit]
Refer to the photos below to determine the pathway of the thread.
Inserting the Needle[edit]
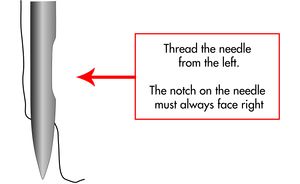
Push the needle up as far as it will go. Thread goes from left to right.
Incorrectly inserted needle will cause thread breakage and possible needle breakage as well.
If the thread is breaking a lot, it’s time to replace the needle. It is recommended to replace the needle after 8 hours of sewing time.
Changing the Foot[edit]
When changing the feet, push the front foot up on the shaft until it stops. Before tightening the screw, use screwdriver to gently pry apart the opening to slide the foot up the shaft. It prevents skipped stitches and mis-feeds on the material.
Troubleshooting[edit]
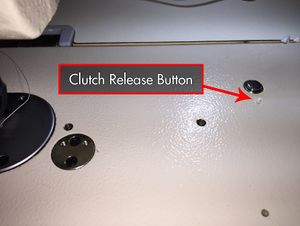
What to do if the machine locks up? This usually occurs when thread is stuck in the bobbin area and the safety clutch engages to prevent further damage.
Press the button on the bed and manually turn the wheel backwards until you hear a click.


