Difference between revisions of "ShopBot"
m (→Safety: link text) |
Ron.Thomas (talk | contribs) m (Reverted edits by John.stechschulte (talk) to last revision by Ron.Thomas) |
||
| Line 12: | Line 12: | ||
* Do not leave the ShopBot running unattended. Hitting the space bar will pause a cut and allow it to be resumed. | * Do not leave the ShopBot running unattended. Hitting the space bar will pause a cut and allow it to be resumed. | ||
* Beware of the tracks that the x-axis carriage travels on. Do not rest your hands on them. The carriage can move quickly and crush fingers. | * Beware of the tracks that the x-axis carriage travels on. Do not rest your hands on them. The carriage can move quickly and crush fingers. | ||
| − | * Be sure your work is securely mounted on the table in all three dimensions (see | + | * Be sure your work is securely mounted on the table in all three dimensions (see yet-to-be-written section, below). |
* Use adequate tabs for any profile cuts. Although there's no one tab size that works for any project, bigger tabs are always safer. | * Use adequate tabs for any profile cuts. Although there's no one tab size that works for any project, bigger tabs are always safer. | ||
| Line 21: | Line 21: | ||
Open the lockbox using the code provided in the ShopBot class, and unlock the power switch. It's recommended that you return the key and lock the lockbox, and just leave the padlock open while you are using the ShopBot. | Open the lockbox using the code provided in the ShopBot class, and unlock the power switch. It's recommended that you return the key and lock the lockbox, and just leave the padlock open while you are using the ShopBot. | ||
| − | + | On the computer, start the ShopBot 3 program. Make sure all the emergency stops are not pushed. When the software starts up, you will need to push the blue reset button. | |
=== Warming up the ShopBot === | === Warming up the ShopBot === | ||
| Line 37: | Line 37: | ||
=== Changing bits === | === Changing bits === | ||
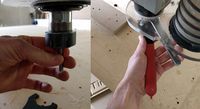
| − | [[File:ShopBot_bit_installation.jpg|thumb|left|200px|Installing a bit. The wrench arrangement shown will tighten when squeezed.]] | + | [[File:ShopBot_bit_installation.jpg|thumb|left|200px|Installing a bit. The wrench arrangement shown will tighten when squeezed, although a smaller angle between the wrenches would be easier.]] |
'''Safety note:''' be sure to close the keypad control before changing the bit. This ensures that it takes more than a single button press to start the tool. | '''Safety note:''' be sure to close the keypad control before changing the bit. This ensures that it takes more than a single button press to start the tool. | ||
Revision as of 18:55, 30 October 2016
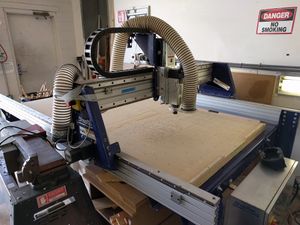
TinkerMill has a ShopBot PRS Alpha, a CNC router that can be used for cutting wood or plastic according to CAD designs. The usual workflow is to create a design in CAD or drawing software (such as Inkscape, CorelDraw, or Adobe Illustrator), load it into VCarve, which plans the cuts and outputs parts files, which are then loaded into the ShopBot software to execute on the machine.
Contents
Basics
The essentials of operating the ShopBot are below. They are here as a reference, and not a substitute for taking the ShopBot class.
Safety
The typical and obvious woodshop safety precautions should also be used with the ShopBot: always wear safety glasses; keep your hands away; do not wear baggy sleeves, jewelry, etc. that might get caught. More specific to the ShopBot:
- Do not leave the ShopBot running unattended. Hitting the space bar will pause a cut and allow it to be resumed.
- Beware of the tracks that the x-axis carriage travels on. Do not rest your hands on them. The carriage can move quickly and crush fingers.
- Be sure your work is securely mounted on the table in all three dimensions (see yet-to-be-written section, below).
- Use adequate tabs for any profile cuts. Although there's no one tab size that works for any project, bigger tabs are always safer.
Starting the ShopBot
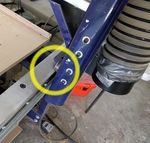
Make sure the ShopBot is plugged in, since it is currently sharing a 3-phase outlet with the table saw. (If the table saw has a green light on the RFID box, hit the red button to log out the previous user before unplugging it.)
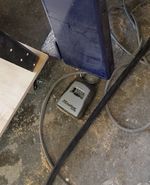
Open the lockbox using the code provided in the ShopBot class, and unlock the power switch. It's recommended that you return the key and lock the lockbox, and just leave the padlock open while you are using the ShopBot.
On the computer, start the ShopBot 3 program. Make sure all the emergency stops are not pushed. When the software starts up, you will need to push the blue reset button.
Warming up the ShopBot
It is important to warm up the ShopBot before use, to protect an important (and expensive) bearing. To warm it up, start the spindle and leave it spinning for about 20 minutes. A reasonable workflow is to start the spindle when you first start up the machine, and then let it go while you secure your work.
To start the spindle, open the keypad control (hit K), and then toggle Output 1 on the Position (red) pane. Then, press the green Start button on the remote.
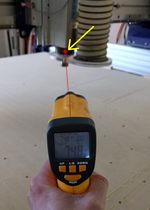
There is an IR laser thermometer in the drawers next to the computer. Use it to measure the temperature of the wide black ring at the bottom of the router, just above the plexiglass. Ideally the temperature should reach 85F, but this may be difficult in the winter.
Securing your work
It is important to secure your work to the ShopBot table in all three dimensions. There are several ways to do this:
- Secure it to the spoilboard with screws. Be sure you use enough and that they sufficiently extend into the ShopBot table (about 1/4").
- If you cannot screw into your work, you can wedge it in place horizontally, and clamp it down vertically, as show in (TODO: do this with something, and take a picture to post here).
Changing bits
Safety note: be sure to close the keypad control before changing the bit. This ensures that it takes more than a single button press to start the tool.
Snap the appropriately-sized collet into the collet nut. Before inserting the bit, align it with the ShopBot spindle and screw it in a few turns. Then, insert the bit and hold it while you hand-tighten the nut. Be sure the flutes are entirely exposed, so the collet has full contact with the bit (and no empty space). Carefully tighten the nut with the two wrenches. It's easiest to align the wrenches so they can just be squeezed together, although it takes some mental acrobatics to apply the right-hand rule upside-down and with a pair of wrenches.
Zeroing
Loading and running cuts
VCarve and planning ShopBot cuts
So you have a beautiful drawing of your part, and you have a ShopBot, which can move a tool around in 3-dimensional space. How can you put the two together to cut your part out? The task of planning toolpaths--where the bit is going to move, and at what speed--is usually accomplished using VCarve. A trial edition is sufficient for planning cuts, and then you can save your work and load it on the full version at TinkerMill to calculate and export toolpaths, which are then loaded into the ShopBot software to be executed. TinkerMill has a MakerSpace license for VCarve Pro, which allows members to activate a home installation of VCarve as clients. The activation key is provided to those taking the ShopBot class.
