Difference between revisions of "Embroidery Digitizing"
m |
m (Added categories to the page) |
||
| (11 intermediate revisions by one other user not shown) | |||
| Line 29: | Line 29: | ||
* [https://www.youtube.com/user/BriTonLeap Embrilliance by BriTonLeap] | * [https://www.youtube.com/user/BriTonLeap Embrilliance by BriTonLeap] | ||
* [https://www.youtube.com/user/LisaSewBubbles LisaSewBubbles (Lisa Shaw)] | * [https://www.youtube.com/user/LisaSewBubbles LisaSewBubbles (Lisa Shaw)] | ||
| + | |||
| + | Lynne's cheat sheets: CHEAT SHEETS | ||
== PE-Design NEXT == | == PE-Design NEXT == | ||
| Line 34: | Line 36: | ||
We have PE-Design NEXT available to use on the Textiles PC. It requires the use of a dongle which should already be attached. PE-Design can also be used to create new designs. However, its interface is a little more cumbersome to use than Embrilliance so I (Lynne Newberry) feel that Embrilliance is the better product to use. | We have PE-Design NEXT available to use on the Textiles PC. It requires the use of a dongle which should already be attached. PE-Design can also be used to create new designs. However, its interface is a little more cumbersome to use than Embrilliance so I (Lynne Newberry) feel that Embrilliance is the better product to use. | ||
| − | However, PE-Design does have some functionality | + | However, PE-Design does have some functionality that Embrilliance lacks. You can create designs based on photos. You are welcome to use this software at any time. |
The MANUAL for the software can be downloaded [[:File:Pednext ug01en.pdf| here]]. | The MANUAL for the software can be downloaded [[:File:Pednext ug01en.pdf| here]]. | ||
| Line 46: | Line 48: | ||
If you're feeling adventurous, you can try adding the [https://inkstitch.org/ Ink/Stitch] extension to [https://inkscape.org/ Inkscape] and use it to create designs. | If you're feeling adventurous, you can try adding the [https://inkstitch.org/ Ink/Stitch] extension to [https://inkscape.org/ Inkscape] and use it to create designs. | ||
| − | = | + | = Considerations = |
| − | Let's imagine we have a simple | + | Let's imagine we have a simple image that we'd like to convert to an embroidery design. How do we approach this? |
| − | + | How big do we want our final design to be? Typical over-the-pocket logos are designed to fit within a 4" x 4" hoop. Back-of-a-shirt designs can be much larger, but could become quite dense and stiff. They also take much longer to sew. | |
| − | How | + | How much detail do we want to preserve in the stitched design? It can become impossible to preserve tiny details in a design. Sometimes a simplification of the design is needed to better convey the logo. |
| − | How | + | How many thread trims will there be? Thread trimming causes the machine to slow down. If you will be doing production embroidery, then the faster the design stitches the better. You can reduce the overall stitching time by reducing the number of thread trims and color changes. Sometimes you can add a line of running stitches between one block of stitching and another of the same color in order to eliminate a thread trim. These "travel" stitches should be in an area which will be stitched over later on. |
| − | + | How many thread colors will there be? On a machine with 6 needles, it is more efficient to keep your total number of colors to 6 or fewer. If you are looking for two shades of a similar color, you can stitch areas using different stitch directions or fill patterns to create different looks with the same color. | |
| − | Do you have a version of the | + | Do you have a version of the design in vector format? This can simplify the digitizing process greatly. You can use Adobe Illustrator or Inkscape to create .ai or .svg files. Embrilliance will usually read both formats. However, the simpler the file the greater the chance of success. Keep in mind that if you have two overlapping closed shapes, these can be converted to two overlapping areas of stitching. If you want the two areas to abut, then the closed vector shapes should also abut. |
| + | |||
| + | If you do not have vectors for your design, you can create them in Embrilliance, Inkscape, or Adobe Illustrator. In Embrilliance, you use the Magic Wand tools. In Inkscape, you can use the Trace Pixel Art or Trace Bit Map. In Adobe Illustrator, you use the Image Trace tool. In all cases, you will end up with vectors with too many nodes. You get the best shapes when using a minimum number of nodes. So it is recommended that you clean up your vectors before converting them to stitches. | ||
= Basic Concepts = | = Basic Concepts = | ||
| Line 64: | Line 68: | ||
You could create an embroidery design by choosing the location of each stitch by hand. I believe this is called manual punching. But usually it is easier to start with lines and closed polygons, converting those shapes into lines of stitching or areas to be filled with stitching. | You could create an embroidery design by choosing the location of each stitch by hand. I believe this is called manual punching. But usually it is easier to start with lines and closed polygons, converting those shapes into lines of stitching or areas to be filled with stitching. | ||
| − | + | Lines can be sewn with a running stitch, a zig-zag stitch, a motif or a "bean" stitch. Here are some examples (shown without 3D simulation and without stitch points): | |
| + | |||
| + | [[Image:LineStitchingSamples.PNG]] | ||
| + | |||
| + | Closed shapes can be filled with a dense satin stitch or a fancy fill pattern. You can set the stitch direction of these fills. Here are some examples (shown with 3D simulation): | ||
| − | + | [[Image:FillStitchSamples.PNG]] | |
| − | + | There is one more shape that is commonly used: a variable width column, which can be filled with like any other closed shape or can be filled with a variable width satin stitch. | |
| − | + | [[Image:VariableWidthColumnSamples.PNG]] | |
| − | + | And you can enter stitches by hand, like this: | |
| − | + | [[Image:ManuallyPlacedStitchesExample.PNG]] | |
These are the basic building blocks of digitizing. Aside from manual punching, every design you create will start with lines, polygons, and sometimes variable width columns. Even text can be broken down into lines, polygons, or variable width columns. But usually your digitizing software will make adding text seamless. | These are the basic building blocks of digitizing. Aside from manual punching, every design you create will start with lines, polygons, and sometimes variable width columns. Even text can be broken down into lines, polygons, or variable width columns. But usually your digitizing software will make adding text seamless. | ||
| − | == How do | + | = Making a Plan = |
| + | |||
| + | Before you digitize your design, you really should make a plan first. | ||
| + | |||
| + | Let's say you found a great picture you want to embroider like this one: | ||
| + | |||
| + | [https://image.freepik.com/free-vector/cartoon-chicken_6996-1070.jpg|cartoon chicken] | ||
| + | |||
| + | You need to create a sewing plan before you digitize. How much detail do you want to preserve? How many colors do you want to use? | ||
| + | |||
| + | I have broken up the design into 10 parts shown below. You can assign a different color to each section. Or you can make shades of colors by changing the stitch directions or fill patterns of different sections with the same color. For example, sections 1 and 2 can be the same color. Sections 3, 4, and 5 can be the same color. | ||
| + | |||
| + | [[Image:ExampleSewingPlan.PNG]] | ||
| − | + | == Adding Pull Compensation Into Your Design == | |
| − | + | If you are filling an area with stitches, you are guaranteed to see some tugging at the edges making your filled shape slightly narrower in the direction of stitch travel: | |
| − | |||
| − | |||
| − | |||
| − | + | PULL COMPENSATION ACTUAL EXAMPLE | |
| + | |||
| + | You can compensate for this narrowing by either using the settings in the software to add pull compensation to your stitch file or you can add overlaps between abutting shapes to fill in the potential gap: | ||
| + | |||
| + | ANOTHER ACTUAL EXAMPLE | ||
| + | |||
| + | You can use both approaches: use the pull compensation settings in the software and add in some overlap between abutting shapes in your design. | ||
| + | |||
| + | As we work through the chicken example, consider where we should be adding in overlaps between shapes. | ||
| + | |||
| + | == Sewing Order == | ||
| + | |||
| + | You want the design to stitch from items furthest away from view to closer items. | ||
| + | |||
| + | Sections 1 and 2 can be stitched in the same color and should certainly be stitched first. The filled shapes should extend under the yellow body so that there will be no gap between the body and the feet and comb. | ||
| + | |||
| + | Sections 3 and 4 need to be stitched next. Because section 4 is further away from the eye, you could choose to stitch it before section 3. And like the red sections, you should have which section is stitched first extend under the following section so there will be no gap between them. | ||
| + | |||
| + | == Holes == | ||
| + | |||
| + | Now as for the wing (section 5), you can choose to either sew it directly on top of sections 3 and 4 or you can choose to create a hole which will be under the wing. If you use a hole, then the stitching will be less dense and thus a little more pliable under the wing. | ||
| + | |||
| + | [[Image:HolesOrNot.PNG]] | ||
| + | |||
| + | The same decision should be made for the eye. You can stitch the white eye on top of the yellow body, but it will be a little thicker and thus a little more stiff. | ||
| + | |||
| + | The eye should be stitched with section 6 in white first. The black part of the eye (7) can be stitched next followed by the eye outline (8) or vice-versa. The outline (8) should overlap both section (3) if there is a hole under the eye and section (6). | ||
| + | |||
| + | Other possibilities are to stitch the white of the eye first followed by section (3) assuming there is a hole where the eye is and then later section (8) which should overlap both (3) and (6). | ||
| + | |||
| + | The beak should be stitched last by stitching section (9) followed by (10). Section (9) needs to extend under section (10) to eliminate any gaps. | ||
| + | |||
| + | == Traveling Stitches == | ||
| + | |||
| + | For faster stitching, we can add a traveling running stitch from the left to the right foot or vice versa. This running stitch will be covered by section (4) so it won't be seen. But it will keep the machine running instead of forcing it to stop and trim the thread between feet which can be a slow process. | ||
== Stitch Direction == | == Stitch Direction == | ||
| − | == Pull-Compensation and Underlay == | + | == Starts and Stop == |
| + | |||
| + | = Digitizing = | ||
| + | |||
| + | Now that we have a plan, we can start creating our stitch file. | ||
| + | |||
| + | == Import Image == | ||
| + | |||
| + | == Magic Wand == | ||
| + | |||
| + | == Using Built-In Shapes == | ||
| + | |||
| + | == Drawing Shapes == | ||
| + | |||
| + | == Adding Holes == | ||
| + | |||
| + | == Import Vector Files == | ||
| + | |||
| + | == Setting Properties == | ||
| + | |||
| + | === Colors === | ||
| + | |||
| + | === Stitch Direction === | ||
| + | |||
| + | === Pull-Compensation and Underlay === | ||
| + | |||
| + | === Tie-Offs === | ||
| + | |||
| + | = Good Digitizing Practices = | ||
| + | |||
| + | == Sew from Center Outwards == | ||
| + | |||
| + | == Digitize for Sewing Speed == | ||
| + | |||
| + | = Free Standing Lace = | ||
| + | |||
| + | = Appliques = | ||
| − | = | + | = Patches = |
| − | = | + | = Red Work = |
| − | = | + | = All the Other Stuff! = |
| − | == | + | == Adding Letters and Monograms == |
| − | = | + | == Circular Repeats == |
| − | + | [[Category:Textiles Shop]] [[Category:Embroidery]] [[Category:Software]] | |
Latest revision as of 23:06, 25 February 2022
Contents
Introduction[edit]
Embroidery digitizing is the process of creating a stitch file for an embroidery machine to sew. The stitch file can be in one of several formats. The embroidery machines at TinkerMill use PES and DST formats (less common).
The stitch file contains a list of commands telling the embroidery machine where to sew, when to trim the threads, when to switch colors, etc.
The process of creating a stitch file is done in digitizing software. We have SewART, PE-Design NEXT and Embrilliance. This Wiki will only cover digitizing with Embrilliance. If you are interested in using PE-Design NEXT or SewART, please see the Resources below for more information.
You can run SewART and/or PE-Design NEXT from the Textiles PC. Embrilliance is installed on at least the Textiles PC and the two laptops available for general use in the front office.
Resources[edit]
Embrilliance[edit]
Embrilliance is an embroidery software package with several modules which add different kinds of functionality. TinkerMill has purchased the following modules:
- Essentials
- Enthusiast
- Stitch Artist Levels 1-3
Essentials and Enthusiast add a lot of capabilities to do things like add words to a design, merge designs, edit colors, flip designs, etc. These are all the things you would want to do if you wanted to work with stitch files you may have purchased. Stitch Artist is the module which is used to create new designs. This is where we will focus our attention.
The MANUAL for the software can be downloaded from the Embrilliance website here or directly here. The manual contains information about all of the modules.
You can also download a demo version of Embrilliance to practice at home with. It works on both PCs and Macs so be sure to pick the right version.
Excellent tutorials abound on the internet for learning Embrilliance. I highly recommend subscribing to the following on YouTube:
Lynne's cheat sheets: CHEAT SHEETS
PE-Design NEXT[edit]
We have PE-Design NEXT available to use on the Textiles PC. It requires the use of a dongle which should already be attached. PE-Design can also be used to create new designs. However, its interface is a little more cumbersome to use than Embrilliance so I (Lynne Newberry) feel that Embrilliance is the better product to use.
However, PE-Design does have some functionality that Embrilliance lacks. You can create designs based on photos. You are welcome to use this software at any time.
The MANUAL for the software can be downloaded here.
SewArt Embroidery Digitizer[edit]
We have SewArt installed on the Textiles PC. This is fairly inexpensive software for digitizing. The MANUAL can be downloaded here. You can download a demo from their website here.
InkStitch extension to Inkscape[edit]
If you're feeling adventurous, you can try adding the Ink/Stitch extension to Inkscape and use it to create designs.
Considerations[edit]
Let's imagine we have a simple image that we'd like to convert to an embroidery design. How do we approach this?
How big do we want our final design to be? Typical over-the-pocket logos are designed to fit within a 4" x 4" hoop. Back-of-a-shirt designs can be much larger, but could become quite dense and stiff. They also take much longer to sew.
How much detail do we want to preserve in the stitched design? It can become impossible to preserve tiny details in a design. Sometimes a simplification of the design is needed to better convey the logo.
How many thread trims will there be? Thread trimming causes the machine to slow down. If you will be doing production embroidery, then the faster the design stitches the better. You can reduce the overall stitching time by reducing the number of thread trims and color changes. Sometimes you can add a line of running stitches between one block of stitching and another of the same color in order to eliminate a thread trim. These "travel" stitches should be in an area which will be stitched over later on.
How many thread colors will there be? On a machine with 6 needles, it is more efficient to keep your total number of colors to 6 or fewer. If you are looking for two shades of a similar color, you can stitch areas using different stitch directions or fill patterns to create different looks with the same color.
Do you have a version of the design in vector format? This can simplify the digitizing process greatly. You can use Adobe Illustrator or Inkscape to create .ai or .svg files. Embrilliance will usually read both formats. However, the simpler the file the greater the chance of success. Keep in mind that if you have two overlapping closed shapes, these can be converted to two overlapping areas of stitching. If you want the two areas to abut, then the closed vector shapes should also abut.
If you do not have vectors for your design, you can create them in Embrilliance, Inkscape, or Adobe Illustrator. In Embrilliance, you use the Magic Wand tools. In Inkscape, you can use the Trace Pixel Art or Trace Bit Map. In Adobe Illustrator, you use the Image Trace tool. In all cases, you will end up with vectors with too many nodes. You get the best shapes when using a minimum number of nodes. So it is recommended that you clean up your vectors before converting them to stitches.
Basic Concepts[edit]
You could create an embroidery design by choosing the location of each stitch by hand. I believe this is called manual punching. But usually it is easier to start with lines and closed polygons, converting those shapes into lines of stitching or areas to be filled with stitching.
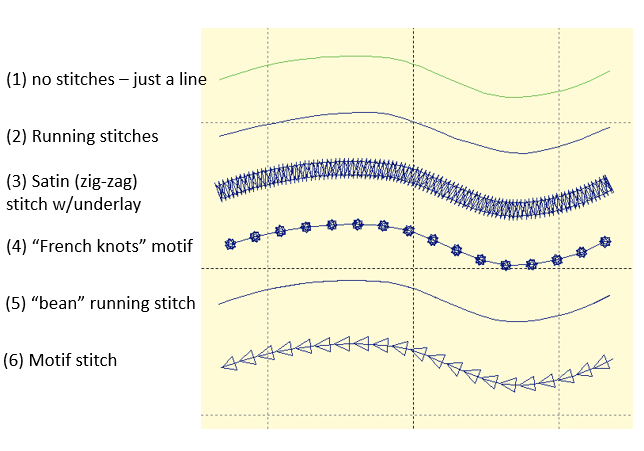
Lines can be sewn with a running stitch, a zig-zag stitch, a motif or a "bean" stitch. Here are some examples (shown without 3D simulation and without stitch points):
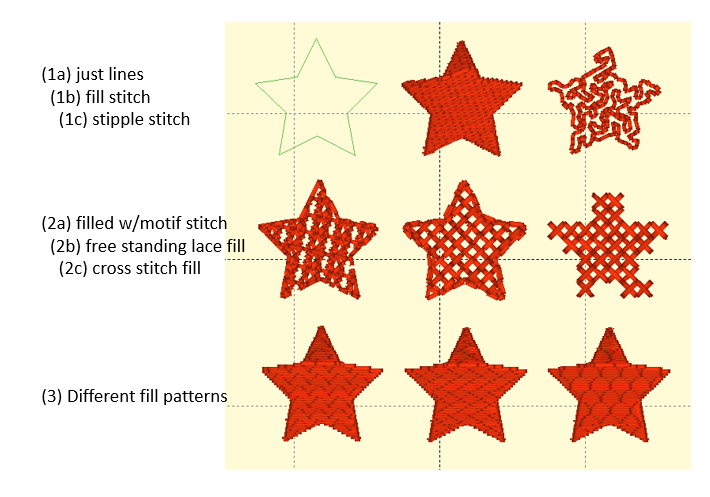
Closed shapes can be filled with a dense satin stitch or a fancy fill pattern. You can set the stitch direction of these fills. Here are some examples (shown with 3D simulation):
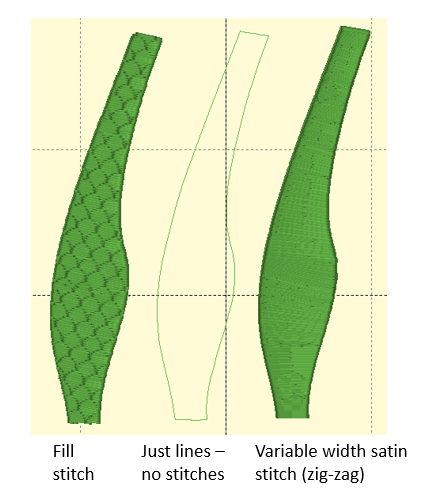
There is one more shape that is commonly used: a variable width column, which can be filled with like any other closed shape or can be filled with a variable width satin stitch.
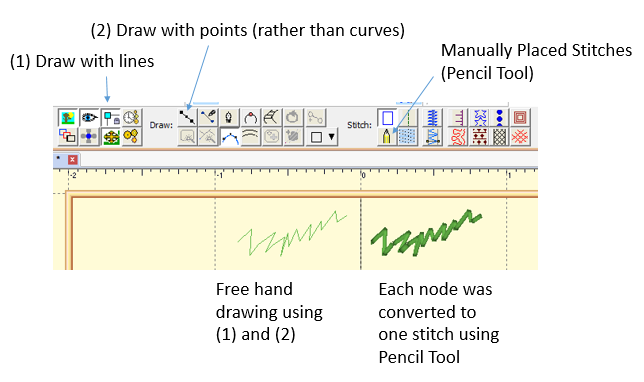
And you can enter stitches by hand, like this:
These are the basic building blocks of digitizing. Aside from manual punching, every design you create will start with lines, polygons, and sometimes variable width columns. Even text can be broken down into lines, polygons, or variable width columns. But usually your digitizing software will make adding text seamless.
Making a Plan[edit]
Before you digitize your design, you really should make a plan first.
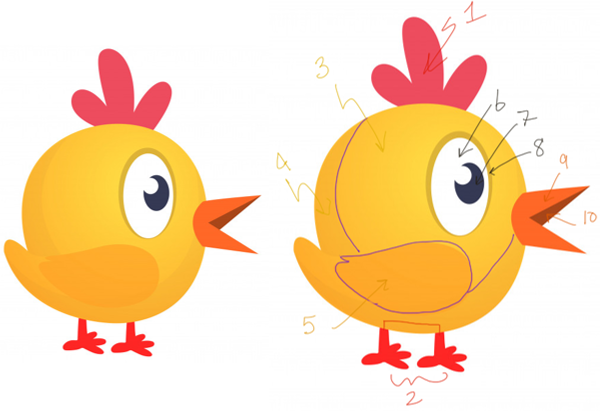
Let's say you found a great picture you want to embroider like this one:
You need to create a sewing plan before you digitize. How much detail do you want to preserve? How many colors do you want to use?
I have broken up the design into 10 parts shown below. You can assign a different color to each section. Or you can make shades of colors by changing the stitch directions or fill patterns of different sections with the same color. For example, sections 1 and 2 can be the same color. Sections 3, 4, and 5 can be the same color.
Adding Pull Compensation Into Your Design[edit]
If you are filling an area with stitches, you are guaranteed to see some tugging at the edges making your filled shape slightly narrower in the direction of stitch travel:
PULL COMPENSATION ACTUAL EXAMPLE
You can compensate for this narrowing by either using the settings in the software to add pull compensation to your stitch file or you can add overlaps between abutting shapes to fill in the potential gap:
ANOTHER ACTUAL EXAMPLE
You can use both approaches: use the pull compensation settings in the software and add in some overlap between abutting shapes in your design.
As we work through the chicken example, consider where we should be adding in overlaps between shapes.
Sewing Order[edit]
You want the design to stitch from items furthest away from view to closer items.
Sections 1 and 2 can be stitched in the same color and should certainly be stitched first. The filled shapes should extend under the yellow body so that there will be no gap between the body and the feet and comb.
Sections 3 and 4 need to be stitched next. Because section 4 is further away from the eye, you could choose to stitch it before section 3. And like the red sections, you should have which section is stitched first extend under the following section so there will be no gap between them.
Holes[edit]
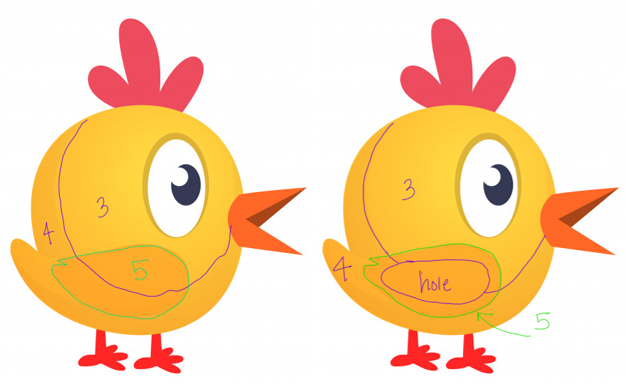
Now as for the wing (section 5), you can choose to either sew it directly on top of sections 3 and 4 or you can choose to create a hole which will be under the wing. If you use a hole, then the stitching will be less dense and thus a little more pliable under the wing.
The same decision should be made for the eye. You can stitch the white eye on top of the yellow body, but it will be a little thicker and thus a little more stiff.
The eye should be stitched with section 6 in white first. The black part of the eye (7) can be stitched next followed by the eye outline (8) or vice-versa. The outline (8) should overlap both section (3) if there is a hole under the eye and section (6).
Other possibilities are to stitch the white of the eye first followed by section (3) assuming there is a hole where the eye is and then later section (8) which should overlap both (3) and (6).
The beak should be stitched last by stitching section (9) followed by (10). Section (9) needs to extend under section (10) to eliminate any gaps.
Traveling Stitches[edit]
For faster stitching, we can add a traveling running stitch from the left to the right foot or vice versa. This running stitch will be covered by section (4) so it won't be seen. But it will keep the machine running instead of forcing it to stop and trim the thread between feet which can be a slow process.
Stitch Direction[edit]
Starts and Stop[edit]
Digitizing[edit]
Now that we have a plan, we can start creating our stitch file.
