Difference between revisions of "Using the Taz Printer"
(Instructions page for using the Taz printer) |
|||
| (8 intermediate revisions by the same user not shown) | |||
| Line 11: | Line 11: | ||
= Basic Workflow = | = Basic Workflow = | ||
| − | + | == Slicing Operations == | |
| − | Slicing Operations | + | |
| − | + | Work within Simplify3D is carried out the same as with all of our filament printers. | |
| − | The current go-to slicing profile is PETG_TAZ0.4 | + | |
| − | Slicing | + | The current go-to slicing profile is PETG_TAZ0.4. This profile is set up for the Taz using PETG with a 0.4mm nozzle and (should) contain the best known general purpose parameters. |
| + | |||
| + | === Slicing Recommendations === | ||
The current Taz configuration with PETG performs relatively poorly in bridging compared to ABS in our other printers. As a result slicing parameters are largely driven by the need for surface quality on top surfaces and in transitions. | The current Taz configuration with PETG performs relatively poorly in bridging compared to ABS in our other printers. As a result slicing parameters are largely driven by the need for surface quality on top surfaces and in transitions. | ||
* Infill below 15% is not recommended. | * Infill below 15% is not recommended. | ||
* Tighter infill patterns (i.e. rectilinear) and/or solid infill angles which reduce the maximum open span are recommended. Open infill patterns (such as hexagonal) and angles which create larger spans will lead to open or distorted to surfaces. | * Tighter infill patterns (i.e. rectilinear) and/or solid infill angles which reduce the maximum open span are recommended. Open infill patterns (such as hexagonal) and angles which create larger spans will lead to open or distorted to surfaces. | ||
* 4 Top layers is recommended using the points above. The first three layers will close most gaps and create a decent surface for the 4th layer. 3 Layers may work depending on part geometry or expectations. In my experience 2 Layers will only work in rare circumstances. | * 4 Top layers is recommended using the points above. The first three layers will close most gaps and create a decent surface for the 4th layer. 3 Layers may work depending on part geometry or expectations. In my experience 2 Layers will only work in rare circumstances. | ||
| − | * 3 Outer perimeters | + | * 3 Outer perimeters is recommended to help with closure on sloping or blended surfaces. 2 Layers is the bare minimum for walls with more vertical angles. |
| − | You do not need an SD card. | + | |
| − | Printer Operations | + | You do not need an SD card. After slicing the job save it in a directory. |
| − | + | ||
| − | Check Filament | + | == Printer Operations == |
| − | Upload the job | + | === Duet Web Control - Main Page === |
| − | + | ||
| − | + | [[File:Duet Web Interface.PNG|600px]] | |
| + | |||
| + | === Check Loaded Filament === | ||
| + | |||
| + | === Upload the job === | ||
| + | |||
| + | There are few ways ways to upload jobs to the Duet3d controller. | ||
| + | * Drag and Drop the .gcode file onto the UPLOAD GCODE FILE(S) button | ||
| + | * Click UPLOAD GCODE FILE(S) and use the dialog to select the file | ||
| + | * Click UPLOAD & START button. | ||
| + | ** This option will start the job immediately after uploading. | ||
| + | |||
| + | [[File:DWC Job Upload.png|600px]] | ||
| + | |||
| + | === Simulating and Starting jobs from the Jobs Page === | ||
| + | |||
| + | Right click on the job for options. | ||
| + | |||
| + | [[File:DWC Job Options.png|600px]] | ||
| + | |||
| + | |||
The printing will start when the heaters have reached their setpoints. | The printing will start when the heaters have reached their setpoints. | ||
Latest revision as of 15:47, 31 October 2021
Contents
Overview[edit]
Taz Printer[edit]
The Taz printer is modified from stock with a Duet3d control board and a Flexion extruder. This printer is primarily set up for PETG filament. Other filaments may be used but are untested as of this time (Oct-27-2021). For filaments other than PETG it is up to users to determine machine parameters and slicing profiles as required. Your mileage will vary, greatly. PETG Is the preferred filament on this machine because it has proven to provide robust results while working in open air and with larger and thicker parts which require the use of this printer. Precious few parts will be successful using ABS on this machine.
The Duet3d/RepRapFirmware controlled printers are significantly different than our other filament printers. These machines have both a graphical touch screen on the printer and use the Duet Web Control (DWC) as the primary interface. The DWC is web based and works within a browser. The machine's control page is visible by any machine connected to the Tinkermill network using the printer's IP address. Refer to the Duet Web Control manual if you want to learn more about working with the Duet interface.
Slicing[edit]
The primary slicer we use is Simplify3D. Any slicer maybe used for preparing jobs but the PETG slicing profile in our local copy of Simplify3D is configured specifically for the Taz and contains the best-tested parameters we have. If you find or know of some good parameters please share! The current go-to slicing profile is PETG_TAZ0.4? This profile is set up for the Taz using PETG with a 0.4mm nozzle and (should) contain the best known general purpose parameters. Jobs are output in text as .gcode files and uploaded to the controller via the web browser interface.
Basic Workflow[edit]
Slicing Operations[edit]
Work within Simplify3D is carried out the same as with all of our filament printers.
The current go-to slicing profile is PETG_TAZ0.4. This profile is set up for the Taz using PETG with a 0.4mm nozzle and (should) contain the best known general purpose parameters.
Slicing Recommendations[edit]
The current Taz configuration with PETG performs relatively poorly in bridging compared to ABS in our other printers. As a result slicing parameters are largely driven by the need for surface quality on top surfaces and in transitions.
- Infill below 15% is not recommended.
- Tighter infill patterns (i.e. rectilinear) and/or solid infill angles which reduce the maximum open span are recommended. Open infill patterns (such as hexagonal) and angles which create larger spans will lead to open or distorted to surfaces.
- 4 Top layers is recommended using the points above. The first three layers will close most gaps and create a decent surface for the 4th layer. 3 Layers may work depending on part geometry or expectations. In my experience 2 Layers will only work in rare circumstances.
- 3 Outer perimeters is recommended to help with closure on sloping or blended surfaces. 2 Layers is the bare minimum for walls with more vertical angles.
You do not need an SD card. After slicing the job save it in a directory.
Printer Operations[edit]
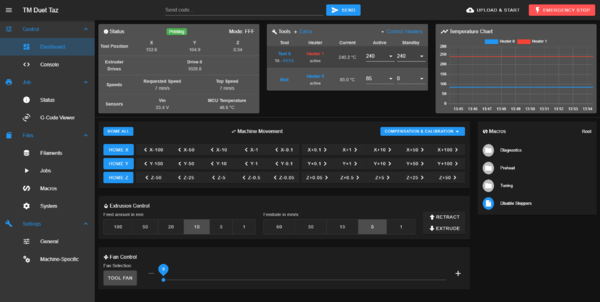
Duet Web Control - Main Page[edit]
Check Loaded Filament[edit]
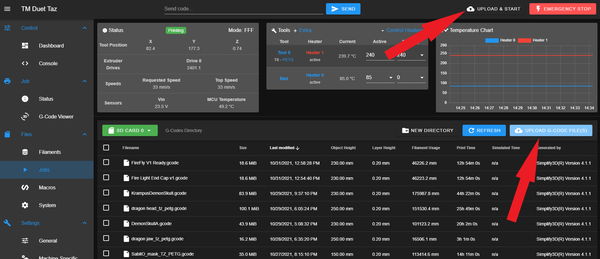
Upload the job[edit]
There are few ways ways to upload jobs to the Duet3d controller.
- Drag and Drop the .gcode file onto the UPLOAD GCODE FILE(S) button
- Click UPLOAD GCODE FILE(S) and use the dialog to select the file
- Click UPLOAD & START button.
- This option will start the job immediately after uploading.
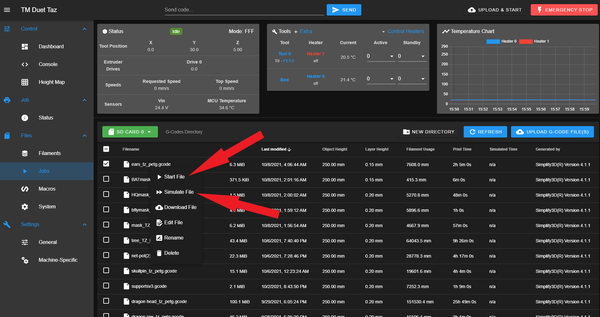
Simulating and Starting jobs from the Jobs Page[edit]
Right click on the job for options.
The printing will start when the heaters have reached their setpoints.


